Fact Vs. Marketing Fiction
If there's any subject with more misinformation circulating about it, it has to be engine oil. Before I explain how to do a DIY oil service, I'll try to clear up some of it here.
In general, oil should be changed based on mileage. However, don't believe the marketing propaganda perpetuated by the quick oil change companies. There is no reason to change oil on modern production vehicles every 3000 miles, particularly if synthetic oil is involved. It's complete overkill because the oil is designed for longer service intervals, it wastes resources, and – perhaps most importantly, it wastes money. If your bimmer is a garage queen and it doesn't get around much, you should still change the oil once every six months. For reference, the oil companies recommend once every 4 months, but I think six months is a bit more practical.
Cars that are covered under BMW's “free scheduled maintenance” will have their oil service performed for free only if you drive enough miles to trip the oil service warning (one yellow or red bar remaining on earlier vehicles, or a negative number in the mileage remaining on later vehicles) OR more than a year has passed since the last service. The good news is even BMW recognizes that oil should be changed based on time if not mileage, but the bad news is that YOU must pay to have an oil service performed if your vehicle does not meet the above criteria. And pay, you should, if there is even a remote possibility that you may keep the car long term (which is to say, more than 4 years or 60K miles).
 I schedule an oil service on the E36 328is (M52 engine) every 4500 miles, or half the recommended interval of 9K miles. By that time even if the oil isn't completely broken down, chemically speaking, it's usually pitch black and should be changed simply to prevent sludge deposits from forming. The newer M54 engine in the E46 330ci burns cleaner than the M52 and can indeed go 7500 miles between changes.
Oil analysis has proven that modern oils like BMW 5W-30 will last approximately 12K miles before breakdown so you could theoretically wait until then, but the paper oil filter insert will never last that long. If you're not sure you will keep the vehicle long term and you insist on being cheap, at least replace the filter at the half-interval point (4500 miles for E36, 7500 for E46). It's easily a DIY procedure as I'll demonstrate below, so it will only cost you the price of the tools + $9 for the filter each time.
In any case, BMW's recommended 15K or higher oil service interval on modern vehicles (E36 or later) is as ludicrous as is the notion of a low-maintenance high performance automobile, and they are gambling the health of your engine with your money. Do yourself a favor and do regular oil services at half the recommended interval. It's cheap insurance.
I also recommend that long term owners start an oil analysis program at 150K miles to develop trend information that may give advance warning of internal engine component failure. Blackstone Laboratories provides a detailed and timely report for a reasonable cost that can be easily "paid" by the labor savings that result from doing it yourself.
Prerequisites
This article assumes you're working on a late model non-M E36 or E46 with black plastic filter cannister cover with 36mm fitting. If you have an older engine with the metal cover and smaller bolt, you will need to research the proper assembly and torque specifications on your own.
- BMW Oil Filter Service Kit (filter + large o-ring + copper crush washer for filler plug)
- Optional: Small o-ring for filter assembly (2 required)
- 6 Quarts BMW 5W-30 (for the 2.8L M52 or 3.0L M54 engine)
- 36mm six point socket with 3/8” drive for filter assembly - Hazet makes the special tool I use.
- 17mm six or twelve point socket for drain bolt. 17mm is a 1/2” drive socket, so you'll also need a 3/8” female to 1/2” male socket adapter for this application.
- 3/8” drive ratchet or breaker bar.
- 3/8” drive torque wrench(es) capable of 25 ft*lbs for filter and 18 ft*lbs for filler plug. These torque values should be as close to the middle of the supported range for accuracy.
- Drain pan with pour spout. A light-colored pan is helpful so you have sufficient contrast to examine the oil as it drains for color and possible metal content. A pan with a built-in pour spout makes it quick and easy to drain the oil into a container you take to your local HazMat facility without making a mess.
- Ramps or a means to jack up the front of the vehicle (Rhino Ramps are recommended.
- Rubber gloves (the blue nitrile type are recommended, but any rubber glove should work).
- Small, CLEAN funnel.
- 1 zip lock storage bag (the ones with the slide lock are recommended for slippery fingers) to contain the old filter.
- Approximately 1 hour
Procedure
Oil Service Highlights

Fig. 1: Loosening Filter Cannister
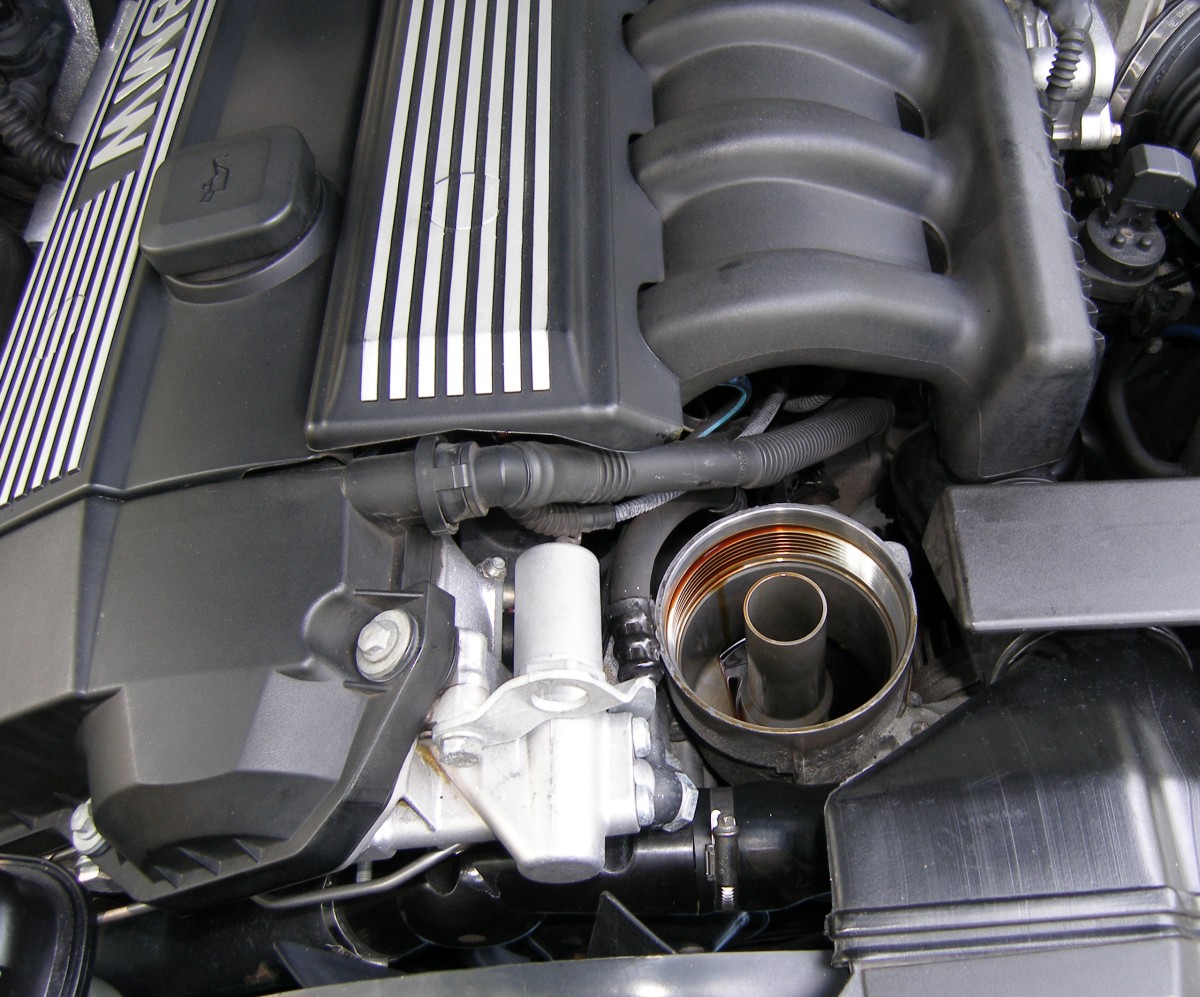
Fig. 2: Oil Filter Removed
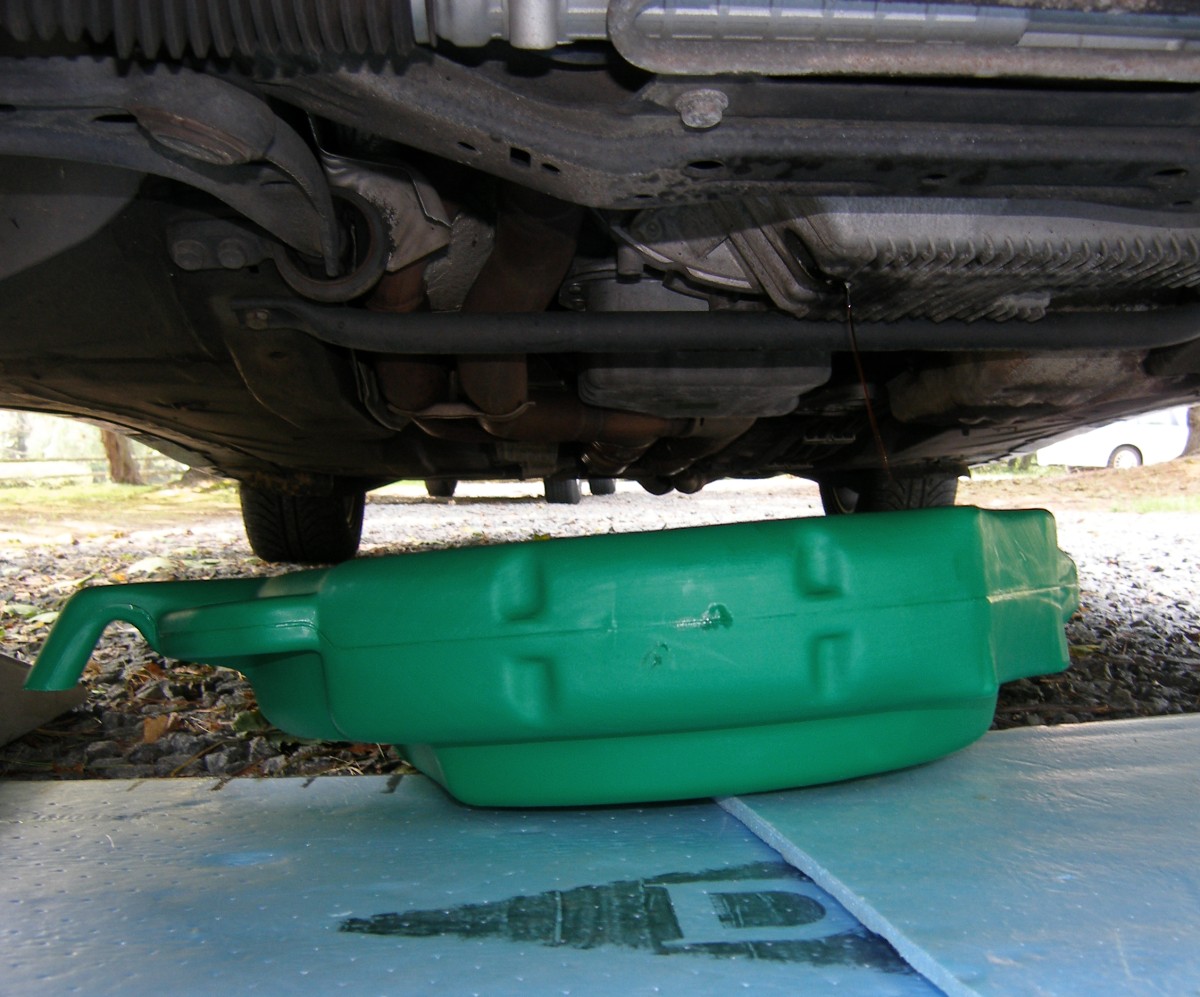
Fig. 3: Oil Draining Into Basin
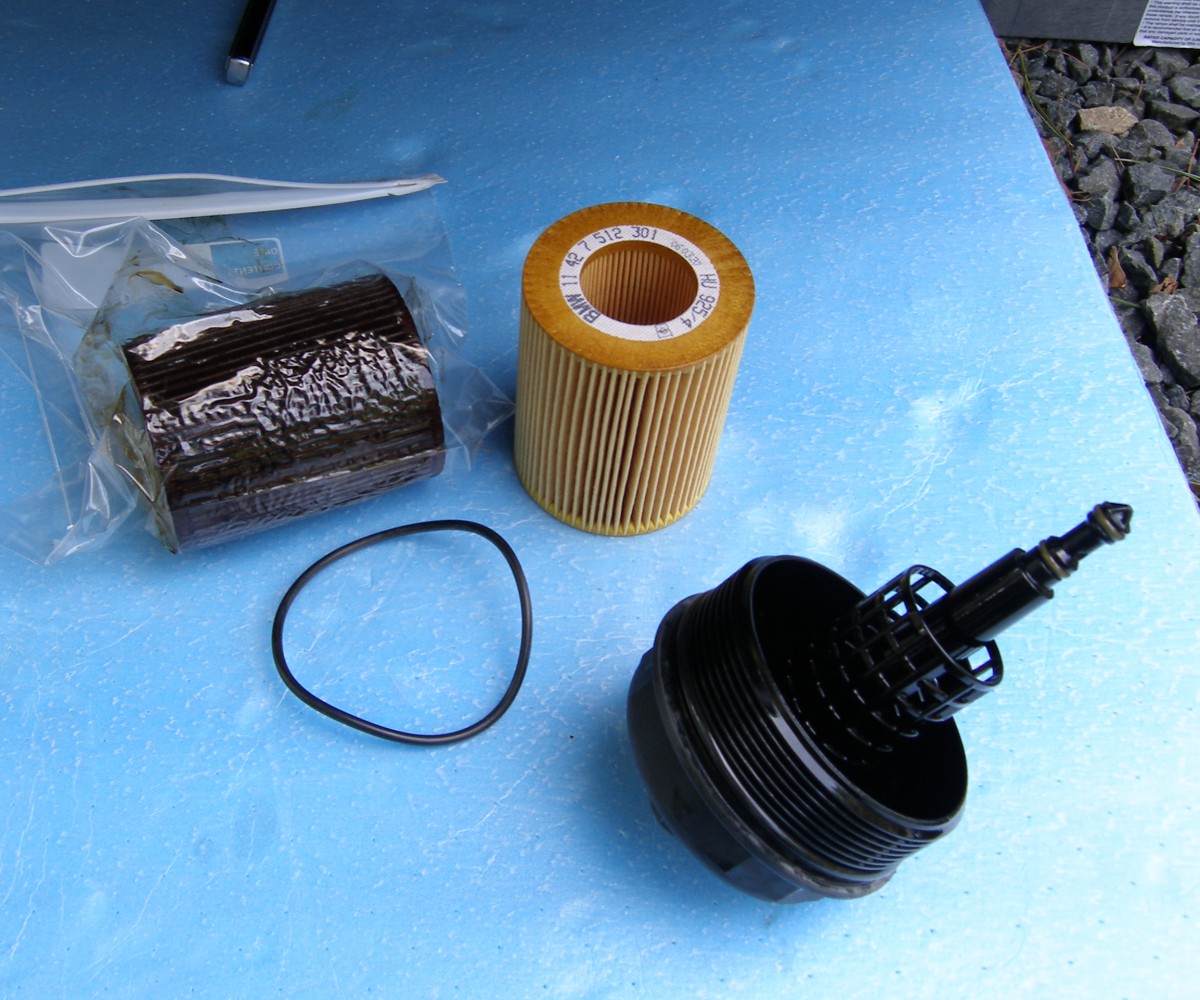
Fig 4: Oil Filters and O-rings
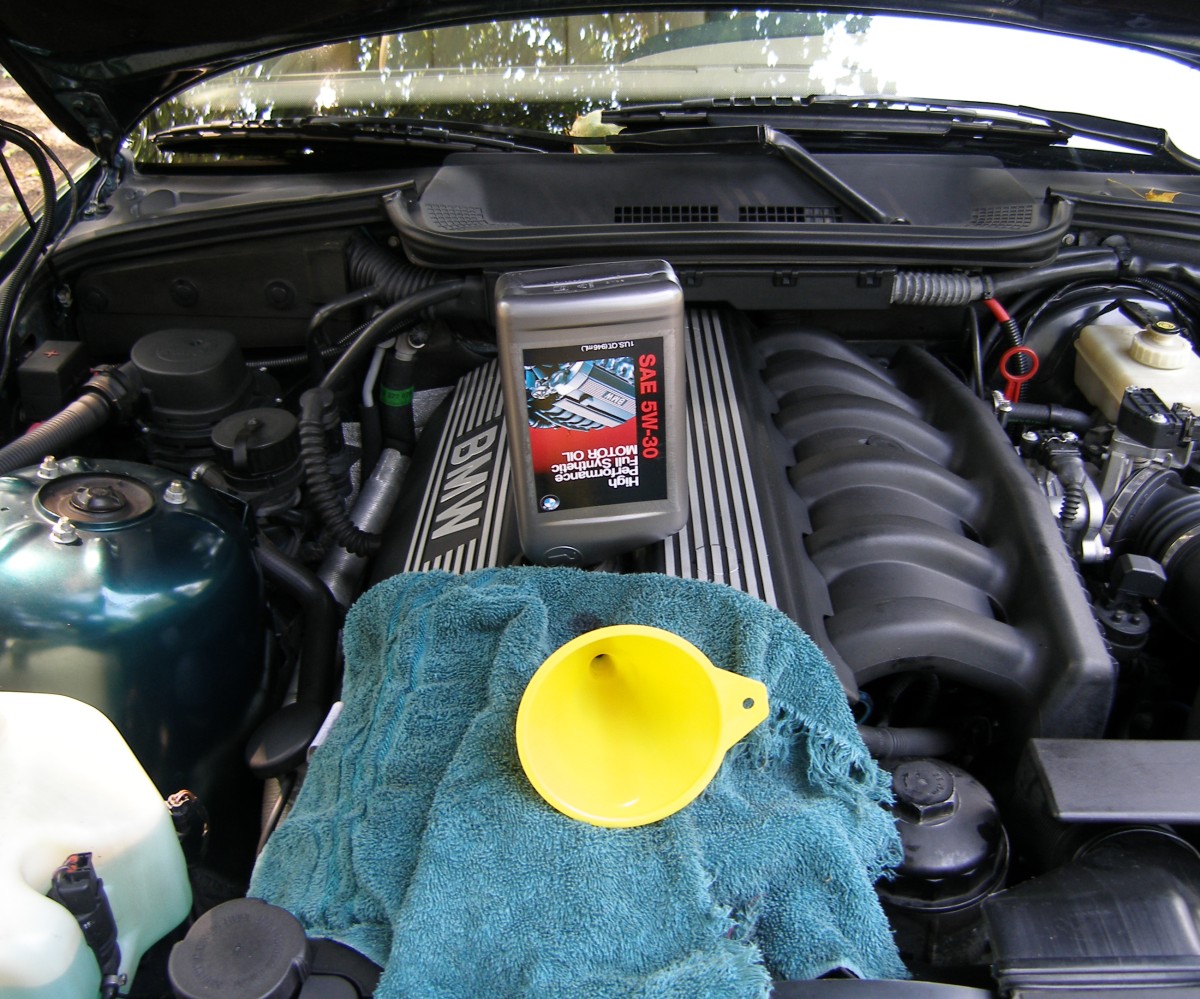
Fig 5: Filling New Oil
- An oil change should be done with the oil warm to the touch. The goal is to get the oil warm enough to flow easily – it does not need to be anywhere near “normal operating temperature”. In fact, the hotter the engine, the longer you have to wait to get near it or you risk scalding yourself with hot oil or burning yourself on various hot engine parts.
- Put the front end on ramps or jack it up on a rigid surface (concrete or THICK, COLD asphalt). Note that metal ramps should NOT be used unless you are working on concrete. They can slice through hot asphalt or other less rigid surfaces and drop the car on you. If you have questions about how to jack up a car now, STOP RIGHT HERE and educate yourself on proper jacking procedures before you kill yourself. Re-read my site disclaimer while you're at it.
- Remove the oil filler cap from the top of the engine and set it somewhere outside of the engine bay (preferably on a nearby table or desk).
- Using a ratchet or breaker bar and the special 3/8” drive 36 mm 6 point socket, loosen the filter cover. You needn't pull it out right now...just fully release the threads.
- Get under the car and remove the drain bolt. I typically break it loose (counterclockwise) with my breaker bar or ratchet (either will work...it should only be torqued to 18 ft*lbs) and then unscrew it by hand while keeping pressure on it toward the block. This helps prevent oil leaking on your hands as you remove the plug. Don't drop the filler bolt into the drain pan. You'll just create a mess trying to fish it out of the pan later. Put the drain bolt in the same place you put the filler cap. You do NOT want to misplace this bolt.
- Do something else for 20 minutes. Yes, it really takes that long for the oil to drain out of the engine, particularly if you just shut it down. This is because a lot of oil is still in the top-end of the engine (and the oil filter) and needs to drain down to the sump. This is the number one problem with those quick-change places (and, truth be told, many dealers). They don't wait the requisite amount of time and you wind up with ½ quart or more of old oil mixed in with your new oil...which throws off any oil-analysis you might do, and almost assures you will overfill the oil.
- Pull the filter assembly from the engine cannister and remove the old oil filter. Put the filter in a zip-lock bag since it will ooze oil forever and you don't want to make a mess.
Now, for reassembly.
- Coat each o-ring in new oil and install them on the filter assembly. This is particularly important for the large o-ring, for if you avoid this step the filter assembly will not rotate easily in the cannister. Note that installing new “small” o-rings is based on condition (they last a long time), but replacement may be considered good practice every other oil service.
- Install the new filter on the filter assembly, (the BMW OE filter insert has no up or down – it can go on either way), reinsert the assembly into the engine filter cannister, and torque the cover to 25 ft*lbs OR the torque specified on the cover itself.
- Make sure the drain bolt is completely clean (clean with brake cleaner or similar if you screwed up and set it down on a dirty floor), install a new crush washer from the filter kit, reinstall the drain bolt\ in the oil pan, and torque the bolt to 18 ft*lbs. Always use a torque wrench and DO NOT OVER-TORQUE the drain bolt. The labor involved in removing the oil pan to fix a stripped drain bolt is daunting. In other words, it costs far more than you'd pay for a decent torque wrench, so don't be stingy with the tools.
- Use a bit of brake cleaner to clean the area of the oil pan near the drain bolt. This will allow you to spot leaks later.
- Fill the engine with exactly six quarts of oil and then reinstall the filler cap. It should rotate 90 degrees until fully seated.
- Clear the engine bay of any towels, gloves, and tools and then start the engine. The oil pressure warning light may remain illuminated for a few seconds more than it usually does, but it should go out within 10 seconds at most. If it doesn't, shutdown the engine and figure out what you did wrong (is there a puddle of new oil under the car? Did you forget to replace the drain bolt?).
- With the engine idling, look under the car for leaks and then put the front end of the vehicle back on the ground. Optionally, go for a short drive. The oil pressure light should never illuminate during this drive. When done, park the car somewhere level (both fore-aft and left and right) so you can...
- Check the oil level after the car has been sitting with the engine off for at least an hour. This will give you the most accurate reading. The level must be within the min / max marks on the dipstick.
Notes
The oil level reading is only accurate when the car is level. You cannot effectively check the oil level when one axle is on ramps or jacked up, or when the car is on a sloped surface. The crown built into some residential streets may even be too much. I say this not because the engine will explode if the level is slightly out of the range. The reason I point it out is that you should NOT make the call to add (or in a worst-case scenario, remove) oil based on the level reading if the car is not perfectly level.
Incidentally, please do not put used motor oil down the drain, into the gutter, or the ground, or throw used filters into the household trash. It should all be brought to your local HazMat facility. Remember -- other people live here too.
Conclusion
Servicing of engine oil is probably one of the most important things you can do to prolong the life of your engine. Properly maintained BMW engines will last at least 250K miles and there are a surprising number of engines going strong with 300K or more without major engine work. Remember, however, that engine oil is only one of several critical fluids that must be changed on a regular basis. I strongly recommend you ignore BMW 's marketing propaganda and replace all other fluids in the vehicle (differential, power steering, and transmission) at regular intervals, or you will indeed learn how expensive a BMW can be to maintain. Look to this site and others for more information.
Now, after reading this, you're probably asking yourself "should I go out an buy tools so I can do my own oil changes on my BMW?" I'd have to say "no", and here's why. Interestingly, oil changes are considered by many dealers and independents as loss leaders, which means they intentionally keep the price of an oil change down in order to get your car back into the shop for more costly repairs. For this reason DIY oil changes do not provide as great return on investment as other, more involved repairs such as brakes or suspension work unless your dealer charges $200 for them and your time is worth nothing. There's simply not enough of a labor savings involved to make DIY oil changes financially practical. You'd have to do at least four changes just to break even on the tools required and for some people that's three or four years worth of driving. I mean, hell, if you're going to do one oil change a year, just take it to the dealer.
That said, however, I now do oil changes myself because I drive enough miles to do 3-4 changes a year, the job is usually performed in conjunction with some other work I'm doing, I can spread the cost of the tools over other projects, and because every dollar I save doing work on my own -- even if it's $50 here and $100 there -- helps to buy a tool for another task or just reduce my overall maintenance budget. So, while I'm content doing my own oil changes, I don't officially recommend people DIY unless you can justify it for some reason OTHER than saving money, like education or simply pride in one's own work.