Introduction
Replacement of oxygen sensors is very simple in principle -- so simple, in fact, that I'd normally not consider it worth a DIY article -- but when was all said and done I felt I'd learned enough about the parts and the process to communicate something of value. This article explains what I needed to know to replace my oxygen sensors.
Emissions Background
The BMW E36 comes in two flavors -- 1995 and prior cars equipped with OBD I, and 1996 and later vehicles equipped with OBD II. The latter system has a standardized physical interface as well as significantly enhanced instrumentation for use in diagnostics and emissions control. For example, OBD II vehicles require an oxygen sensor to control fuel mixture ("pre-cat"), a catalytic converter to reduce emissions and a second oxygen sensor downstream of the cat ("post-cat") in order to verify the catalyst is doing its job.
My 1998 E36 328is came from the factory with the tubular stainless steel headers and twin-pipe midsection from the M3. Dual exhaust is great because it lets the engine breathe better and develop more power, but when it comes to emissions control it means additional cost since the car has two of everything, or a total of four (4) oxygen sensors(!)
BMW recommends replacement of oxygen sensors every 100K miles and they have a very good reason for this. As oxygen sensors age they cause the DME to believe the mixture is leaner than it really is, which naturally causes the DME to enrichen the mixture. This richer mixture results in incomplete combustion and byproducts that can, over time, damage the catalytic converters. While oxygen sensors are expensive in their own right and having to replace four of them may seem like cruel and unusual punishment, keep in mind that the M3 midsection retails for the tidy sum of $1950. So, unless you want to be forced to replace the oxygen sensors AND the midsection, do yourself a favor and stick to the proper sensor replacement interval.
Replacement of the pre-cat sensors alone can reach $700 or more if performed at the dealer, which explains why I chose to do this job myself. Fortunately, the task is straightforward and only requires a few special tools and a plan. If you are limited on funds, I recommend you replace only the pre-cat sensor(s) because defective pre-cat sensors can cause all sorts of problems including rough running, a drop in MPG in addition to catalyst damage, while all defective post-cat sensors will do in the short term is flag a check engine light (CEL).
Warning: Due to the potential differences in accuracy between new and old sensors, you should always replace BOTH pre-cat sensors or BOTH post-cat sensors or you may cause more problems than you solve.
Prerequisites
Oxygen Sensor Highlights

Fig. 1: Sensor Branding
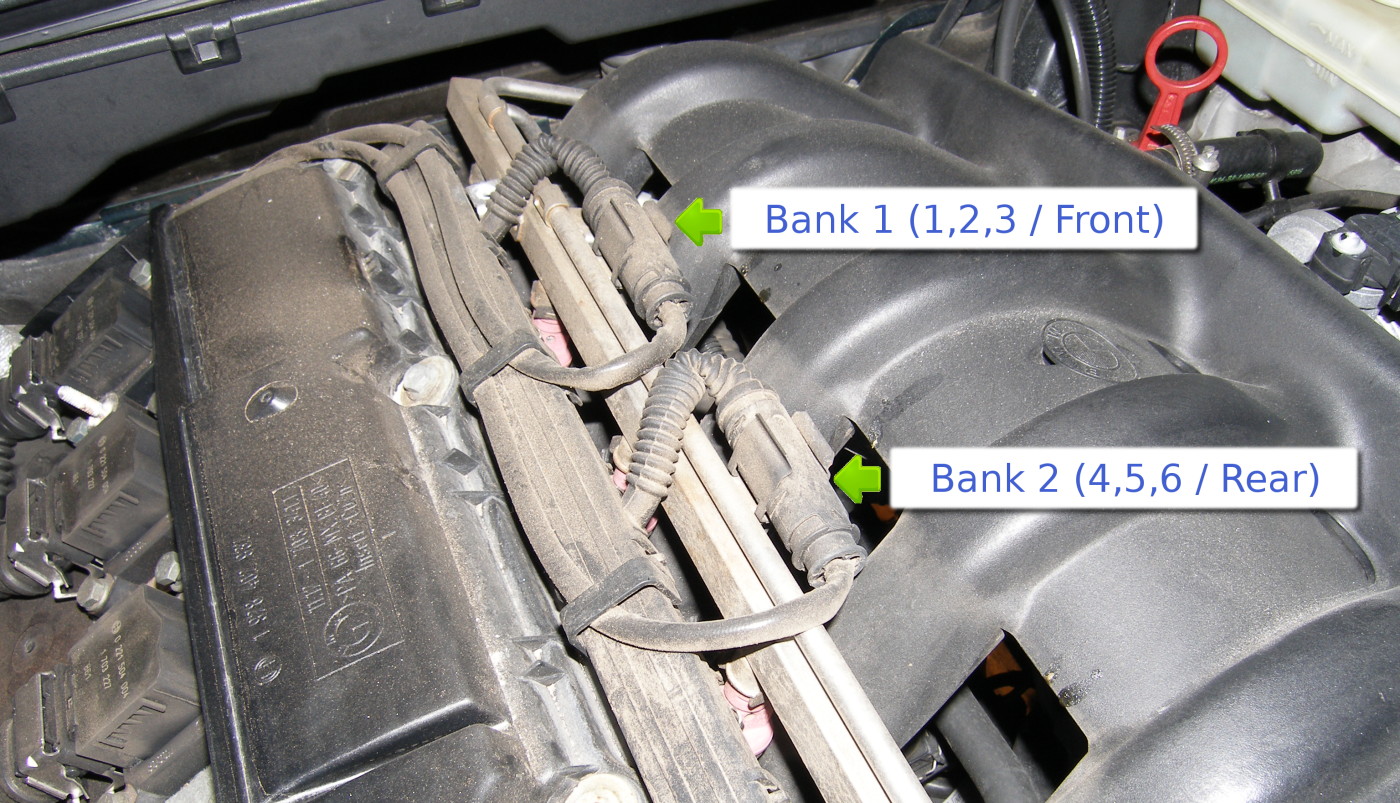
Fig. 2: Pre-Cat Sensor Plugs
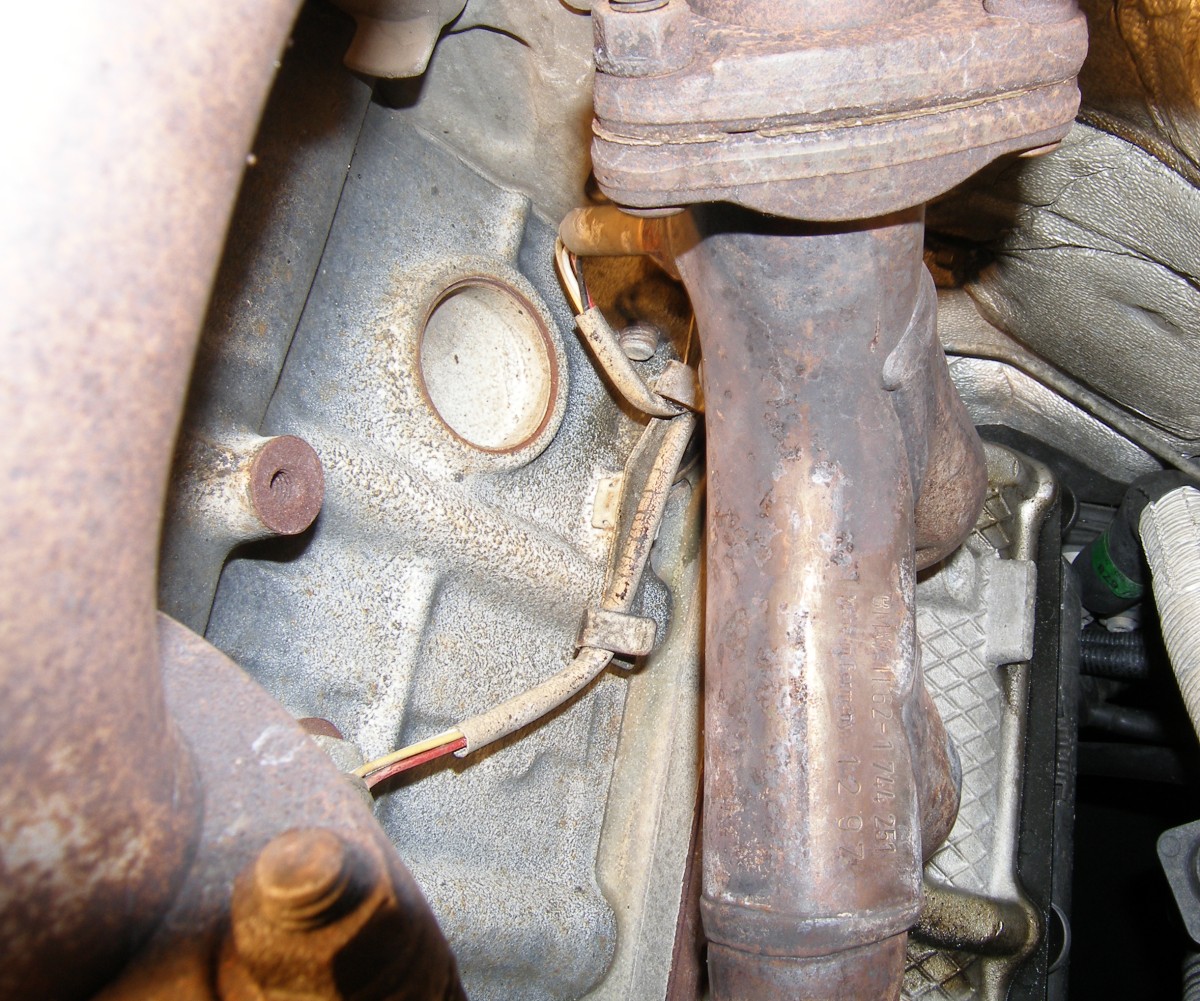
Fig. 3: Pre-Cat Sensors on Headers
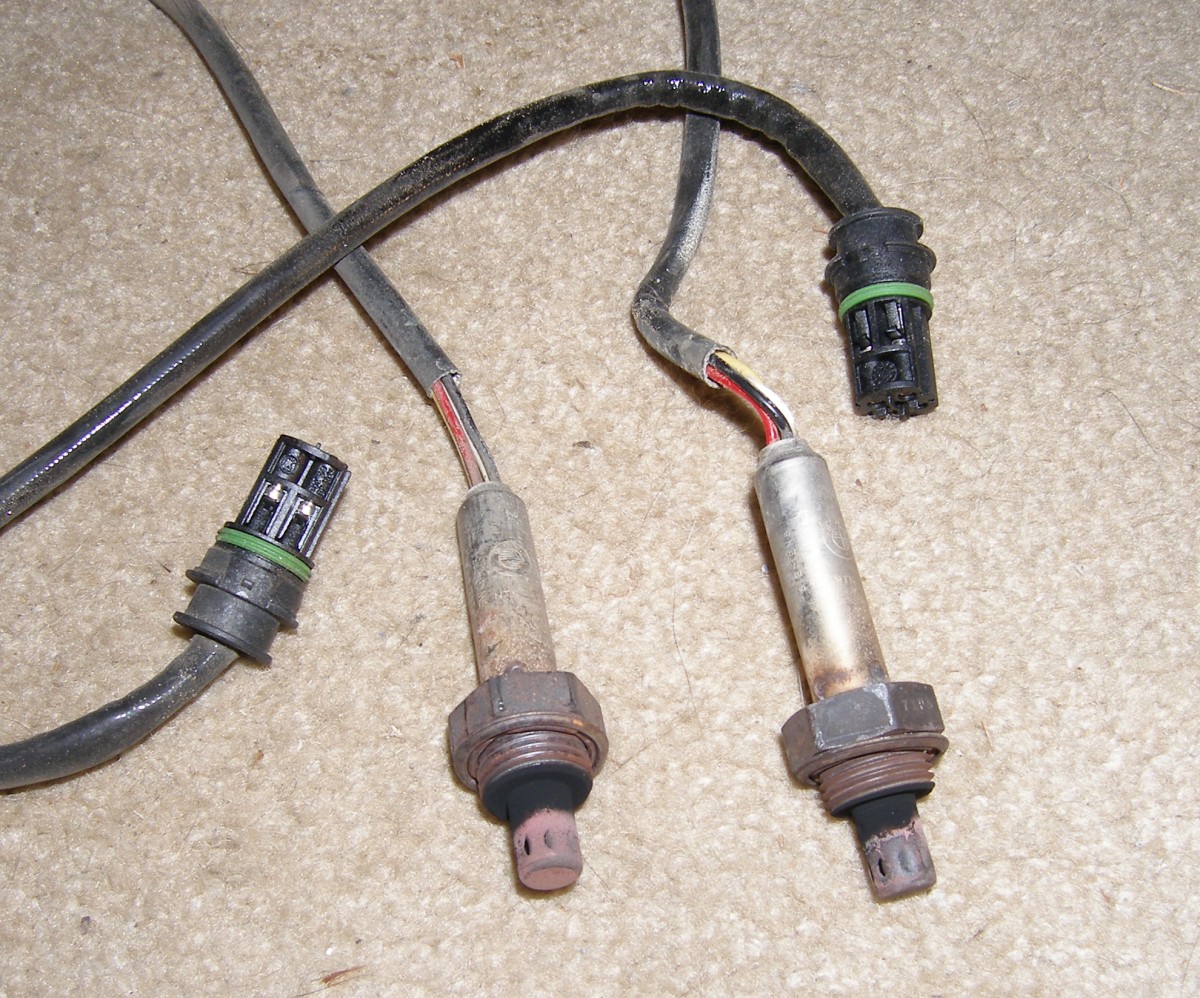
Fig. 4: Old Sensors after 140K Miles
To replace your oxygen sensors you'll need
- Jack (2 ton rating or higher)
- Jack Stands (3 ton rating or higher)
- Safety glasses -- protect your eyes from falling debris!
- 22mm 6/12 point crows foot oxygen sensor socket.
- 3/8" swivel head ratchet or breaker bar (handle no longer than 10 inches)
- Oxygen sensors appropriate to the exact model and year vehicle. Consult realoem.com or your dealer's parts department for the proper part number(s).
About Oxygen Sensors
When I began to look for new oxygen sensors I checked realoem.com for a part number and price. It turns out that until a build date of 4/98 (shortly after my car was produced) all four oxygen sensors are the same: BMW part number 11781427884. This part has the notation "SIEMENS/L=990" in the description. Siemens, of course, is the manufacturer of the part and research revealed that L means the length of the lead. 990mm is 38 inches, or a bit over three feet, which is clearly the length needed to reach from the top of the engine, near the fuel rail where the pre-cat sensor plugs are, to the headers. The obvious downside to the BMW part was the price -- $195 on a somewhat outdated realoem price book (the actual price is closer to $225 now), so I went in search for aftermarket sensors. This was an educational experience, let me tell you.
The first thing I learned is that there are two types of oxygen sensors available in the aftermarket. The type required by the Bosch DME is the titania sensor. So, if you do decide to buy aftermarket sensors or are intent on trying to fit a universal sensor to this car (that practice is actually discouraged by many DIYers), no matter what you buy, you must make sure they're of this type. If you don't, at the very least the car will run like crap and you'll be out the cost of the sensor.
The second thing I learned is that while Siemens is technically listed as the parts supplier on BMW's ETK, the sensors are actually made by NTK -- a Japanese company. This is no surprise, really. Siemens is smart enough to realize that they can't build everything themselves and they source parts from other manufacturers just like BMW does. The problem comes in when you add one or more tiers of profit margin onto an otherwise reasonably priced sensor -- it gets expensive very quickly.
NTK actually makes the sensor (NTK part number 25013) and sells it for about $80 in the aftermarket (courtesy of bimmerparts.com). They also sell the sensor to Siemens and Bosch (Bosch part number 13844), who then turn around and retail it for about $110 under their respective names (courtesy of bavauto.com). BMW contracts with Bosch to provide the BMW OE part with their logo stamped on it, but as all automotive companies do, they tack on about 100% margin. This results in the $225 retail price that you or I would pay at the dealer's parts desk.
At this point I wondered if I could really trust the NTK sensor to be identical in function to the Siemens / OE sensor so I went in search of user feedback. Sure enough, I found several reports of the NTK 25013 parts failing prematurely. Now, I know full well that the supply chain works in such a way that the parts that meet OE specs are sold to the OE, while parts that don't necessarily meet that spec but are otherwise marketable are sold in the aftermarket, so it wouldn't surprise me that NTK plays this game as well. But since a failed pre-cat sensor causes the engine to run rough and can damage the cats, while failed post-cat sensors simply trip codes, I didn't want to take a chance here. I ultimately decided to buy the OE sensors from Tischer (at $155 each) and see if they were stamped with NTK as some people said they were. The sensors arrived and I hastily opened the box to find my new sensor that had the familiar BMW logo stamped on it...right next to those of Siemens and NTK. If you don't believe me, see Figure 1.
So, I think it's safe to say at this point that NTK is the sensor OEM and Siemens just reboxes them for BMW, but I'm not 100% confident that they are the same exact sensor made to the same quality standards. If you want to save $60 a sensor, you're welcome to test that theory, but for me, I'll stick with the OE sensor for the pre-cat application so I don't give BMW any excuses to deny warranty coverage for the new cat when or if it's installed. I am, however, more than likely to go for the NTK or Bosch branded parts for the post-cat units. I'll be pissed if they fail prematurely, that's for sure, but at least I won't be pissed that they destroyed my $1600 mid-section or left me on the side of the road with a rough running engine.
Pre-Catalyst Sensors
To replace the pre-catalyst sensors:
- Jack up the front of the car and put the car securely on jack stands. If you support the car only by the jack, it's likely you won't live long enough to reap the benefits of your new sensors.
- Crawl under the car from the front (with your head pointing at the rear of the vehicle) and look on the right side of the motor for the exhaust manifolds. On OBD I cars the single pre-cat oxygen sensor is located near the y-pipe joint, but on all OBD II cars they're located in the headers just aft of where the pipes of the three cylinders join into a single pipe.
- Attempt to loosen each oxygen sensor. The reason we do this first is simple -- if you can't loosen them, there's no sense in continuing. If you manage to get both sensors loose, continue to the next step. If not, make sure the sensors are tight before you extract yourself from under the vehicle. Exhaust leaks are no fun.
- Remove the fuel rail cover on the engine. This is the long and thin cover toward the driver's side of the engine. I also removed the larger cover for additional clearance at the rear of the engine but it's not essential you do so.
- Take note of the oxygen sensor plugs on the top of the fuel rail cover. The sensor closest to the front of the car is for Bank 1 or cylinders 1, 2, and 3, while the other is naturally for Bank 2 (cyls 4, 5, 6). While the Pre-Cat sensors will always be the same part number and should be interchangeable themselves, the leads must NOT be crossed. This means that the sensor in the forward header must always go to bank 1, etc. If you swap leads the engine will run very rough. Ensure that you will not cross the leads by removing only ONE plug at a time. See Figure 2.
- The oxygen sensor leads run from the plugs to the back of the engine, then along the rear of the valve cover toward the passenger's side of the engine where they drop vertically along the side of the engine and eventually rearward to meet the respective sensors. Begin by removing the small black "c-clips" that retain the leads on the top of the engine. Set them aside outside of the engine bay for safe keeping.
- Pick a sensor plug to remove. Follow the lead toward and along the back of the engine. It is held in place on the rear and side of the engine by bendable metal tabs. Carefully bend these tabs open so the lead(s) can be removed. There are a couple tabs on the rear of the engine near the valve cover that can be reached while standing in front of the car. The remainder of the tabs must be reached from under the vehicle. You may need to work some of the tabs loose by feel. See figure 3 and note in this picture that I've already loosened the tabs somewhat.
- Once you've worked the lead loose, pull it down toward the sensor so you can loosen the sensor without the wires twisting. While you have new sensors available, the goal is to preserve the old sensors in case one of the new sensors is DOA.
- Remove the sensor using the crows foot socket. I found that my 3/8" SK breaker bar and its pivoting head worked wonders on this job. You could use a ratchet with a pivoting head as well. For a peek at the condition of my original sensors with all of 140K miles on them, see Figure 4.
Install the new sensor as follows:
- Without touching the end of the sensor and keeping it away from any oil or grease, insert the plug into the bung on the exhaust header. Twist it clockwise by hand and periodically untwist the lead to prevent stressing the wires. The sensors I purchased came with a light coating of anti-seize on the threads and it's likely yours will too, so you needn't add anti-seize unless it's obvious the threads are bare. In that case, make sure you don't get any anti-seize compound on the tip of the sensor or it may cause erratic readings and premature failure.
- When the sensor is hand tight, use the oxygen sensor socket and breaker bar or ratchet to tighten the sensor. There's no way to use a torque wrench on this due to a lack of clearance but the sensor comes equipped with a crush washer. Tighten the sensor until you feel the crush washer deforming and then stop. That will be good enough.
- Untwist the sensor lead and route it such that it loosely follows the path of the original lead. The goal is to get it past the headers so you can drape the plug end over a nearby wire or pipe and grab it from the top of the engine compartment. Don't bother to fasten the lead into the retaining clips at this time, as it will be easier to group this lead with the lead from the other sensor before you secure it permanently.
- Get out from under the car, grab the sensor lead and loosely route it around the back of the engine and up to the socket. Plug the socket in.
- Repeat this procedure with the other sensor.
Test Drive
After replacing the other pre-cat sensor, finish up by grouping and properly securing both leads and replacing the retaining clips on the fuel rail. Then start the engine and take the car out for a test drive of at least five minutes or long enough to get the exhaust to full operating temperature. This ensures that the sensors are being used to control the mixture and are functioning correctly. You should not experience any engine roughness. On the contrary, particularly if your sensors were known to be bad you should notice an immediate improvement in engine performance. When you return from the test drive, replace the engine covers and drink a beer to celebrate.
Post-Catalyst Sensors
Replacement of the post-cat sensors is easier than the pre-cat sensors because access is a bit better. Use the same techniques to R&R them. Be sure to perform an inspection of the plastic raceway used to protect the sensor leads and plugs. If it is damaged due to heat or road debris, you should replace it before you replace the sensors.
Conclusion
Oxygen sensors should definitely be replaced at 100K miles. After I replaced the pre-cat sensors on my car the fuel efficiency increased by 2 MPG as measured over several tanks of gas. That's not much, but it did prove that the sensors do change as they age.
There is still some conjecture concerning whether the BMW sensors are any better than the aftermarket units but it's safe to say you can't go wrong with the BMW units. If you order them from Tischer, you'll save almost 30% off retail, and that's nothing to sneeze at.