BMW Balance
Brakes are just one of the ways that contribute to the "balance" of BMW performance. I mean, any idiot can put a big engine in their car and make it go fast in a straight line -- but ask the vehicle to take a turn just as quickly and you need a great suspension to keep up with it. Similarly, once you get a vehicle up to high speed, you need a reliable means to bring it to a stop -- in a hurry if necessary. To borrow a well-worn marketing slogan -- power is nothing without control. BMW brakes give you that control -- provided you replace them when required.
This article aims to communicate the insights gathered while doing my first DIY brake job on my E36. The E46 shares the same basic platform as the E36 (except in the case of my 330, the brakes are just a bit bigger), so the procedures should apply to either model. However, I still recommend you reference a copy of the Bentley repair manual for your specific vehicle to make sure you do the right thing.
Prerequisites
BMW recommends brake fluid be flushed every two years. Every year would be better. If you haven't flushed your fluid in that time and you're about to replace the brakes, it's a good idea to do that while the wheels are off. I had my dealer flush the fluid for me in preparation for this work, so that is not documented here.
To perform a brake job, you should have ready access to the following:
- Rubber gloves
- Brake cleaner (aerosol)
- A parts washer or other makeshift wash basin
- Permatex Anti-Seize in brush top can (silver is fine, copper is better)
- Plastilube high temperature grease (essential -- don't do a BMW brake job without it)
- Floor jack (2 ton rating or higher)
- 2 Jack stands (3 ton rating or higher) on lowest height setting
- 16mm standard depth socket for caliper carrier bracket
- 17mm deep socket to remove wheel lug bolts
- 6mm allen (hex) head socket for rotor retaining screw
- 7mm allen (hex) head socket for caliper guide bolts
- 1 or 2 flat blade screwdrivers to aid in removing the retaining clip
- 24" 1/2" drive breaker bar for removing lug bolts and caliper bracket
- Torque wrench(es) capable of 22 and 81 ft*lbs.
- One large ("irrigation-type") syringe (optional; depends on the level of fluid in your brake reservoir).
- WD-40 (optional, depending on whether the rotors come off the car easily or not)
- Appropriate rotors and pads. Include wear sensors if the brake lining warning has illuminated (check realoem.com)
- About 2.5 hours per axle if this is your first time, less if you know what you're doing. Book labor is 2 hours per axle.
Front Brakes
Brake Change Highlights

Fig. 1: Caliper Closeup

Fig. 2: Old front pad thickness

Fig. 3: Old rear pad thickness

Fig 4: Piston Extended

Fig 5: Piston Compressed

Fig 6: Torque guide bolts
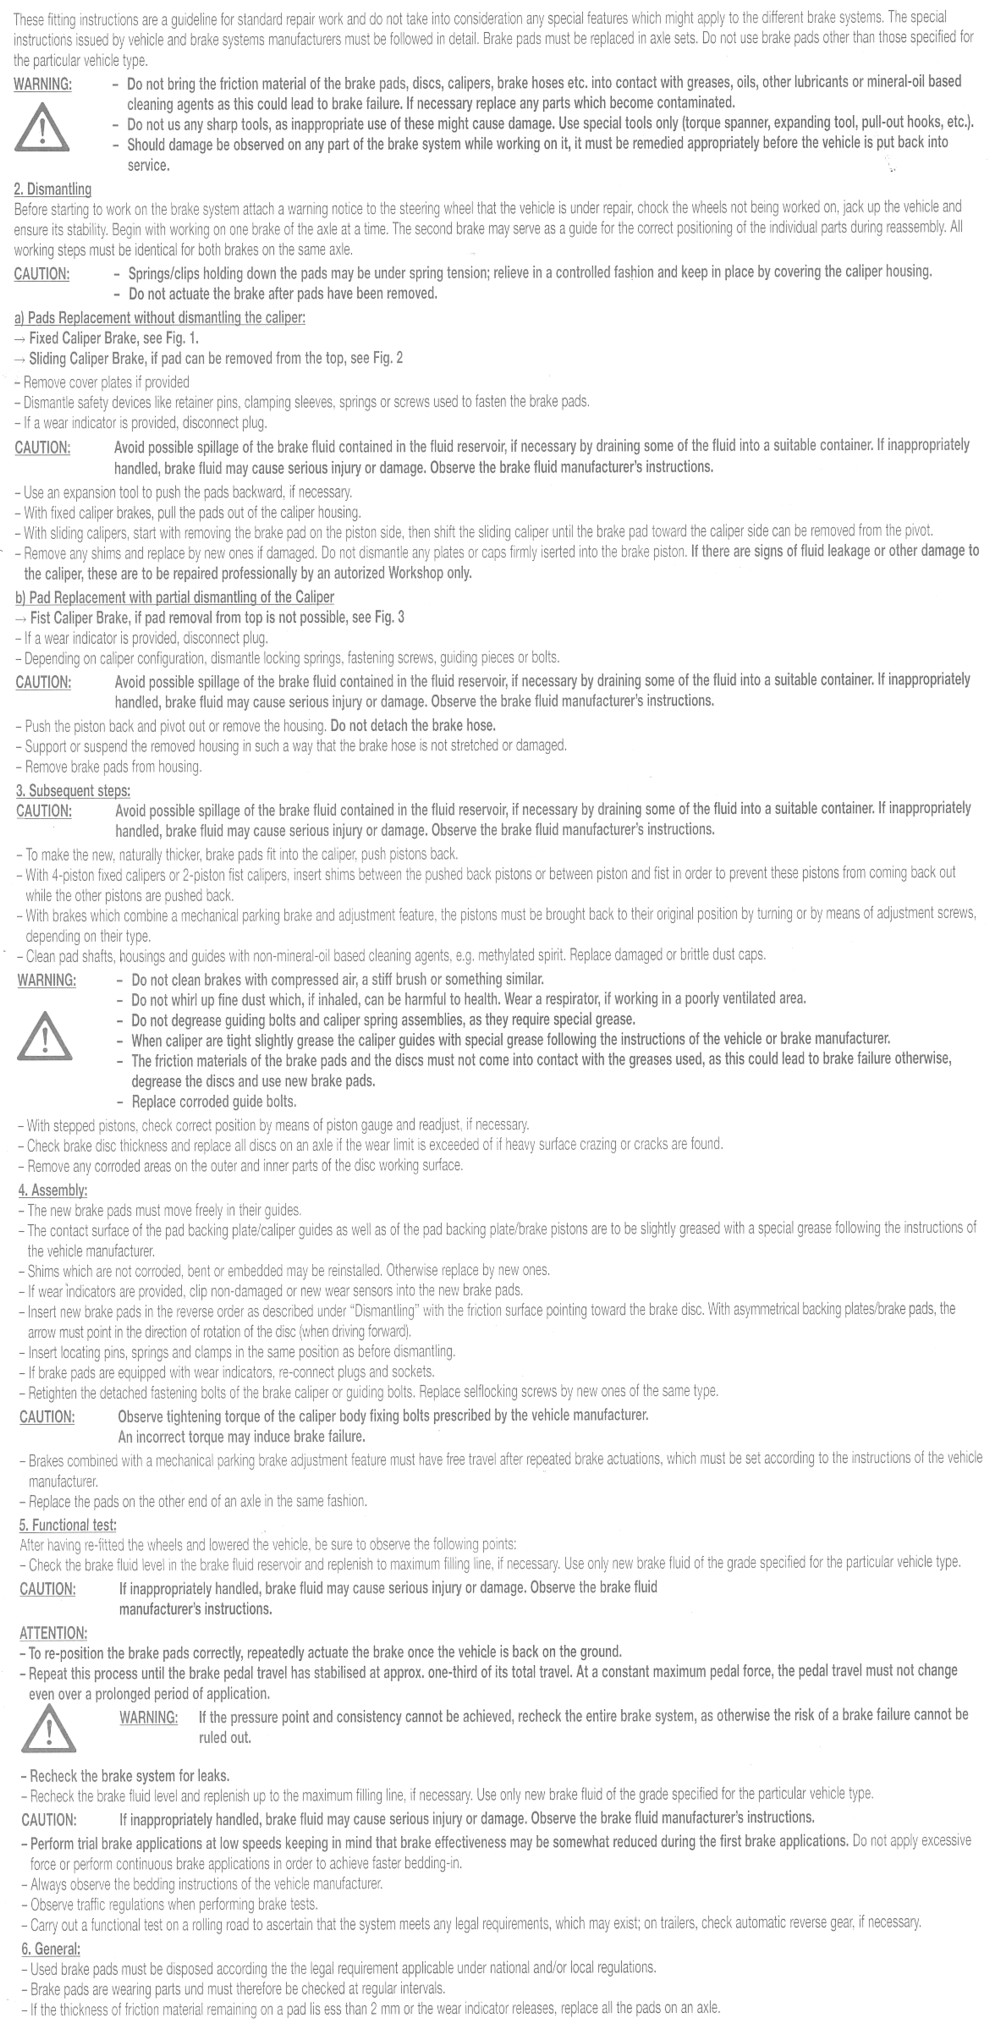
Fig 7: Brake Pad Instructions
- Take a look at the instructions that come with your brake pads. See Figure 7 for a scanned copy of the instructions that accompanied my BMW OE pads. You may note some statements in these instructions conflict with BMW recommendations. In those cases, always follow BMW's recommendations, since these pads are but one part of a complete system and only the system integrator (BMW) can know what's best for the entire system.
- If you don't have air tools at your disposal, break the wheel bolts loose with a breaker bar. Do not remove them. The goal here is to leverage the weight of the vehicle to keep the wheels from turning as you hang on the bar.
- Jack up the front of the vehicle and support it on jack stands. I won't detail how to do that here. If you don't know how to jack up a BMW, STOP RIGHT HERE and learn how before your life really depends on it. Free advice that might just save your life: NEVER RELY ON A JACK ALONE TO SUPPORT YOUR VEHICLE!
- LOOSEN (but do not remove) the rotor retaining screw on each side. If the screws have been on there a long time, they may be difficult to remove, and unless you can get them off (or feel comfortable drilling them out) there's no point in continuing with this work. Fortunately, mine loosened with a couple of well supported tugs of the ratchet. I say "supported" because the bolts are made of a relatively soft metal and will strip if you get lazy and don't support the wrench and apply the torque properly.
- You can start on either side of the vehicle, but if you've never done a BMW brake job before, I recommend you start on the RIGHT side (as viewed from the driver's seat) first so you don't need to concern yourself with the brake pad wear sensor. It's not that it's a big deal, but it's one less thing to worry about the first time around. Put your key in the ignition and turn it to position 1 to free the steering lock and turn the wheel to the left until it stops. Turn the key back to position 0 (off) so you don't drain your battery. This will give you better access to the caliper on the right side of the vehicle.
- Remove the retaining clip. It seems like such a simple thing, but the clip does its job and doesn't want to leave the caliper. The trick is to take a small flat-blade screwdriver and approach each hole in the caliper from the center of the wheel, wedge the tip in and under the clip as close to the hole as possible and pry it up. An additional flat blade screwdriver may come in handy keeping one side of the clip out while you pry the other side.
- Remove the protective caps over the caliper guide bolts. See Figure 1. When you remove these caps, the point is not to grab the "shaft" but the very edge of the cap. The shaft is a flexible rubber sleeve and the cap fits into the end of that. I don't know what's involved to replace damaged sleeves, so don't damage them. I was able to pry the cap out with gloved fingers, but a small screwdriver may help. With the cap removed, remove the guide bolts. These are only torqued to 22 ft*lbs, so it shouldn't take much effort to remove them unless someone overtorqued them during the last brake job.
- Now we need to remove the caliper. Once the guide bolts are removed, you'd tend to think the caliper would just pull off, but if the rotors are worn, you'll have to get the pads past the ridge on the outer circumference that forms as the rotor wears because the pads are slightly smaller than the rotors. The problem is the ridge can prevent the inboard pad from pulling away from the rotor, and since the inboard pad is connected to the caliper piston the caliper won't move unless you can compress the piston as required. You can use a c-clamp for this, but note that if you intend to reuse the rotor, be sure to put some kind of shim (wood or otherwise) between the clamp and the rotor face, or else you may damage the rotor surface.
- Do yourself a favor at this point and take note of how the outer pad sits in the carrier, how the inner pad is fastened to the piston, and the size of the piston. The areas of the pad backing plate that contact the face of the piston and the carrier will need to be lubricated with Plastilube high temperature grease during reassembly. Speaking of pads, Figure 2 shows what remains of the front linings when the brake wear indicator lamp illuminates.
- With the caliper removed and the inner pad still connected to the piston, use your C-clamp or other compression tool to push the piston back into the caliper. This is required to get the caliper to fit over the new, thicker pads. On my first time around, I used a compression clamp like woodworkers use, but based on that experience I can tell you that the c-clamp is the way to go simply because it takes a good amount of force to get the piston to fully retract. See Figures 4 and 5 for a before and after shot, respectively. It's pretty amazing how far out of the caliper body the piston extends. This is one of the reasons why pushing the pistons back into the caliper causes the fluid level in the reservoir to rise so much (about 1/4" per axle). And speaking of reservoir level, here's a tip. If you're bleeding the brakes prior to the brake job (always a wise choice), fill the reservoir only to the minimum mark. That way when you push all four pistons in you'll wind up with the level at or near the maximum and you won't risk overflowing it. Of course, you should always check the reservoir after compressing each piston anyway just to make sure you're not going to make a mess. Brake fluid is corrosive and will gladly remove paint from any surface it touches.
- With the caliper removed and supported, remove the caliper carrier from the steering knuckle by loosening the two 16mm bolts. Note that these are torqued to 81 ft*lbs, and may very well require a breaker bar or air tools to remove. My 24" breaker bar made very quick and easy work of this. With the bracket removed, it's a good idea (though certainly not required) at this point to clean up the carrier with some brake cleaner. I took the part over to a plastic storage tub I bought for this purpose and went to work. I got a lot of gunk off of it including a lot of old grease and brake dust.
- Now the fun part, where we get to look like a pro mechanic. Grab the nearest metal hammer, baby sledge, or (in my case) a dead blow hammer, and hit the rotor once at the 3 o'clock position, then at the 9 o'clock, followed by six, and 12. If you're lucky, the rotor will brake away from the hub after the six o-clock hit. This is the way the BMW techs do it, and it works. Note that using anything but a dead-blow hammer will likely damage the rotor and make it unsuitable for reuse.
If you've gotten this far, congrats. You're half way there. Let's start the reassembly process.
- Now that the rotor is removed, you're likely to find a lot of old anti-seize compound on the hub. I used brake cleaner combined with a Scotch-Brite pad to remove that and generally clean up the face of the hub and the threads of each bolt hole. Again, this isn't strictly necessary. Wiping it with a towel would probably be sufficient, but I like to be thorough. Once the hub is cleaned, apply a very thin coat of anti-seize to the face of the hub. You don't want to go overboard here...this is simply to aid removal of the rotor at some future date.
- When ready to install the new rotor, pull it from the box with your hands in the center of the hub ONLY. Do not grab the rotor by the edges and do not get the friction surfaces dirty. It's a bit clumsy to handle the rotor this way, but certainly possible. Clean the friction surfaces of the rotor with brake cleaner and some paper towels. This will remove any preservative oil and allow the pads to bed in properly. Put a touch of anti-seize on the threads of the rotor retaining bolt and thread it through the rotor into the hub. The torque spec on this screw is 12 ft*lbs, but I didn't bother to use a torque wrench for it. Just tighten it until the rotor is fully seated and leave it at that. Even if it's a touch loose (it won't be), that's okay so long as the head of the bolt is recessed relative to the face of the rotor. The bolt is only there to aid in manufacturing and to retain the rotor if the wheel is removed. As you've probably figured out by now, after a while the rotor binds itself to the hub (yes, even with anti-seize applied), so the bolt serves little purpose in the real world. Whatever you do, do NOT overtorque it, or you'll hate life when it comes time to do the next brake job.
- Clean the carrier bracket in your wash basin and pay particular attention to the area in which the pad backing plates slide in the carrier. Use a small toothbrush to remove the old bits of grease and pad material before shooting them one last time with brake cleaner and letting them dry. Reinstall the caliper carrier bracket and torque the bolts to 81 ft*lbs, and remember that for the most accurate torque settings, the torque wrench must be "moving" when the click occurs to achieve an accurate result. Do not apply anti-seize to the threads. They're a dry fit.
- Place a small tab of Plastilube grease on the lubrication points of the pads. Start with the outer pad first and then insert it into carrier. When ready to install the inner pad, in addition to the lubrication points on the corners, put a bit of grease around the clips in a circular pattern that will contact the caliper piston when installed. Although the pads come with an anti-squeal shim bonded to the inboard side of the backing plate, this grease helps prevent the pad from vibrating against the piston at high frequency and generating that lovely, comforting sound we know as "squealing brakes".
- Reinstall the caliper. If you've fully retracted the piston, it should fit over the pads and rotor very easily. Before inserting the guide pins clean them with some brake cleaner and a scotch-brite pad. Do not make the common mistake of applying grease to the guide bolts or anti-seize to the threads. They're a dry fit, and with good reason. If you grease the pins, the stock rubber bushings will swell and cause the caliper to hang up. The result will be excessive outer pad wear. And if you use anti-seize on the threads, you will likely torque them beyond the required 22 ft*lbs. And speaking of torque, Figure 6 demonstrates one of the advantages of buying a torque wrench with a pivoting head. I took advantage of the extra clearance as I tightened the bolts prior to final torque. Just as the bolt started to firm up, I straightened the wrench so I didn't need to do any math to compensate for the offset.
- Reinstall the guide bolt caps and the retaining clip.
- Take a moment to pat yourself on the back. One down, three more wheels to go.
Repeat the above for the left wheel. The procedure is the same except that you'll need to contend with the brake wear sensor. The connection between the vehicle's wiring and the sensor wiring is contained within a small plastic box at the top of the wheel well. Simply open the door on the box and pull the connector out of the box and disconnect it. You needn't disconnect the sensor from the pad if you're tossing the pads (as I expect you are...otherwise why are you doing this?)
Rear Brakes
The rear brakes follow the same procedure as well except the carrier bracket is torqued to only 50 ft*lbs and you can expect the brake wear sensor to be on the right rear. Also, if your parking brake needs adjustment, now's the time to do it. Mine was fine because I never use it, so I didn't bother with it.
The only snag I had with the entire process came when I tried to remove the right rear rotor. I pounded on the rotor several times but it didn't budge. I then carefully applied a bit of WD-40 to each threaded lug bolt hole and waited a while before rotating the hub and repeating the process. The goal here was not to do a full blast trigger application of WD-40 because the overspray might contaminate the parking brakes. Rather, I used the red tube that comes with the bottle to apply the fluid directly to the seam between the hub and rotor. Ten minutes later, I grabbed the rotor with my hands and it came off. I followed up by cleaning the hub with brake cleaner before applying a fresh coat of anti-seize and installing the new rotor.
Incidentally, the left rear rotor came off very easily, but that was likely because it had been removed recently to replace the wheel bearing. Rear rotors are more likely to get stuck simply because they're typically replaced half as often as the fronts. Remember to apply anti-seize to the hub!
Test Drive and Break-In
When you're ready to take the car for a test drive, hop in and press the brake pedal several times. The first few times you press the pedal it will feel soft, but will firm up nicely when the pistons are once again pushed out of the calipers and close up the gap between the pads and the rotor. If the pedal continues to feel soft, you may have some air in the system that should be bled before you drive the vehicle. This is much more likely if you have bled the brakes. The average brake job will not introduce any air into the system.
The procedure to break in the brakes varies among pad manufacturer. The instructions that come with the BMW pads strongly advise against aggressive braking or "dragging" the brakes to speed up the bedding process for the first 125 miles. So, contrary to all that you've heard, you don't do anything special to bed in BMW OE brake pads. Just take off slowly, test the brakes to make sure the car will stop, and then go for a normal drive at reasonable (residential) speeds, using the brakes only as required, letting them cool down between uses. The instructions also point out that braking performance will be lower than normal until the pads are fully seasoned. For what it's worth, my technician always told me to take it easy on the brakes for the first 250 miles.
Preventing Brake Warping
Warping of BMW brakes is very rare. If your brakes do warp, there are a couple likely causes:
- Improper cool-down. If you have to use your brakes very aggressively, you need a "cool-down" period during which you keep the car moving and let the rotors shed the heat properly. If you stop completely (say, at a traffic light), the pads will cause the rotor to cool down unevenly, and that will cause a permanent deformation in the rotor which you will feel as vibration in the pedal. The good news is that I have aggressively driven this car on more than one occasion and never had any warping problems. If you have to stop aggressively at or slightly before a traffic light, here's a tip: stop before the line and creep forward every 15-30 seconds until the light changes.
- Rotors are too thin. This can occur when rotors are cut and brought below minimum thickness (reminder: never cut BMW rotors), or when you try to be a cheapskate and use the rotors for more than one set of pads. If you do this, by the time the second set of pads are even 25% worn, your rotors are very likely below spec. Moral: replace your rotors when you replace your pads. They're not that expensive and this isn't your grandmother's Buick.
Conclusion
Most people get 30K out of a set of front brakes and 60K out of the rears. The fact that I managed 48K on the fronts before tripping the brake lining warning is really no surprise because I drive a lot of highway miles. What really surprised me is the fact that I managed over 72K on the rear brakes by this point, and based on the amount of material left on both pads (See Figures 2, 3) and rotors I think I could have run them until 80K. I simply chose to do them now for convenience.
I can't believe I paid other people to do this job for so long. Ask me to rebuild a transmission, and I'll be the first one to bend over and give the dealership my credit card, but with the exception of getting the pads around the ridge on the rotor, I can tell you with confidence that BMW brakes are easy to replace. Of course, like most automotive work it can get a bit messy (be ready to sacrifice an old pair of jeans and a t-shirt to the task), but I think the reward of learning something new, having the knowledge that the job was done right, and saving big bucks on labor is worth the inconvenience.
So, what kind of savings are we talking about here? The dealer now charges just shy of $1000 for the parts and labor required to perform a four-wheel brake job. I got all OE parts for $340, so that means I saved roughly $600 doing this myself. Not a bad trade for a few hours on a lazy Sunday afternoon, don't you agree?