Introduction
When you think about old cars that leak oil in the driveway, BMWs don't usually come to mind, but as the engines age various rubber sealing gaskets dry out and lose their ability to keep oil where it should be. If you've attempted to replace the spark plugs on your E36 or E46 BMW and have found oil at the base of one or more plug holes, this is a sure sign that the valve cover gaskets are leaking and it's time to replace them.
In this DIY, I'll communicate the process I used to replace the valve cover gaskets on my E36's M52 engine. Since replacing the gaskets involves pulling the ignition coils and my plugs were ready for replacement at 72K miles, I replaced the plugs and coil boots in addition to the gaskets, but you obviously don't need to replace these additional components unless necessary. See my maintenance schedule spreadsheet for a recommended replacement interval for all components.
Prerequisites
Replacement of the valve cover gasket is simple in principle and requires only basic tools that any DIY technician should have in their toolbox.
To replace the valve cover gasket you'll need:
- Rubber gloves
- Brake cleaner (aerosol)
- High temperature silver or copper RTV -- make sure it says "oxygen sensor safe". Do not use regular construction-type RTV.
- Telescoping mirror.
- Small flat-blade screwdriver
- Torque wrench capable of 89 inch pounds (about 7.4 ft*lbs)
- Torque wrench capable of 30 Nm or 22 ft*lbs
- Shallow and deep 10mm sockets with ratchet to match (1/4" or 3/8" drive)
- 6" long 3/8" drive fixed extension for spark plugs. Wobble / swivel extensions are not recommended to reinstall plugs because of the increased risk for cross-threading. The fixed extension and socket will give you the feel you need to detect cross-threading before it happens.
- 3" long 1/4" or 3/8" drive fixed extension for valve cover retaining bolts
- 5/8" spark plug socket with rubber retaining grommet
- Some electrical or duct tape
- (1) Valve cover gasket kit. This consists of two smaller gaskets for the plug holes and a single larger gasket for the perimeter of the valve cover.
- (15) Valve cover retaining bolt rubber gaskets. These are more likely to leak than the gaskets themselves, so anytime you pull the valve cover, you should replace these gaskets.
- Optional: (6) Spark Plugs. BMW recommends platinum plugs and provides either Bosch or NGK -- the consensus is the NGK are best and that's what I've been running for more than 100K miles. If you choose to replace the plugs, replace them all at the same time.
- Optional: (6) Coil Boots. Only required if they're dried out, cracked, or the electrodes are highly oxidized. I decided to replace them while I had everything apart for preventative maintenance.
- 1.5 hours of your day for spark plugs
- 1.5 hours of your day for valve cover gaskets
Procedure
Valve Cover Gasket Highlights
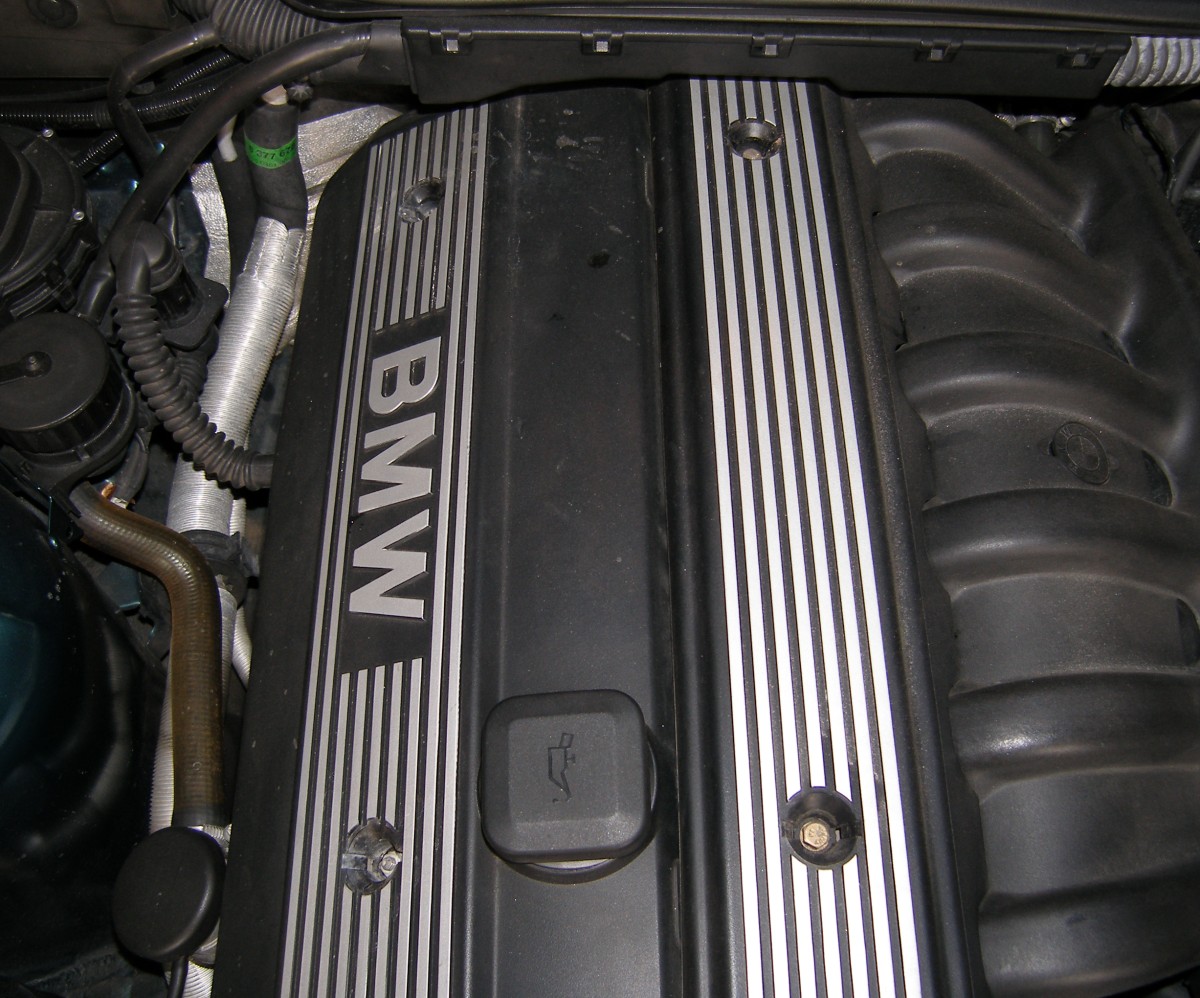
Fig. 1: Engine Cover Fasteners
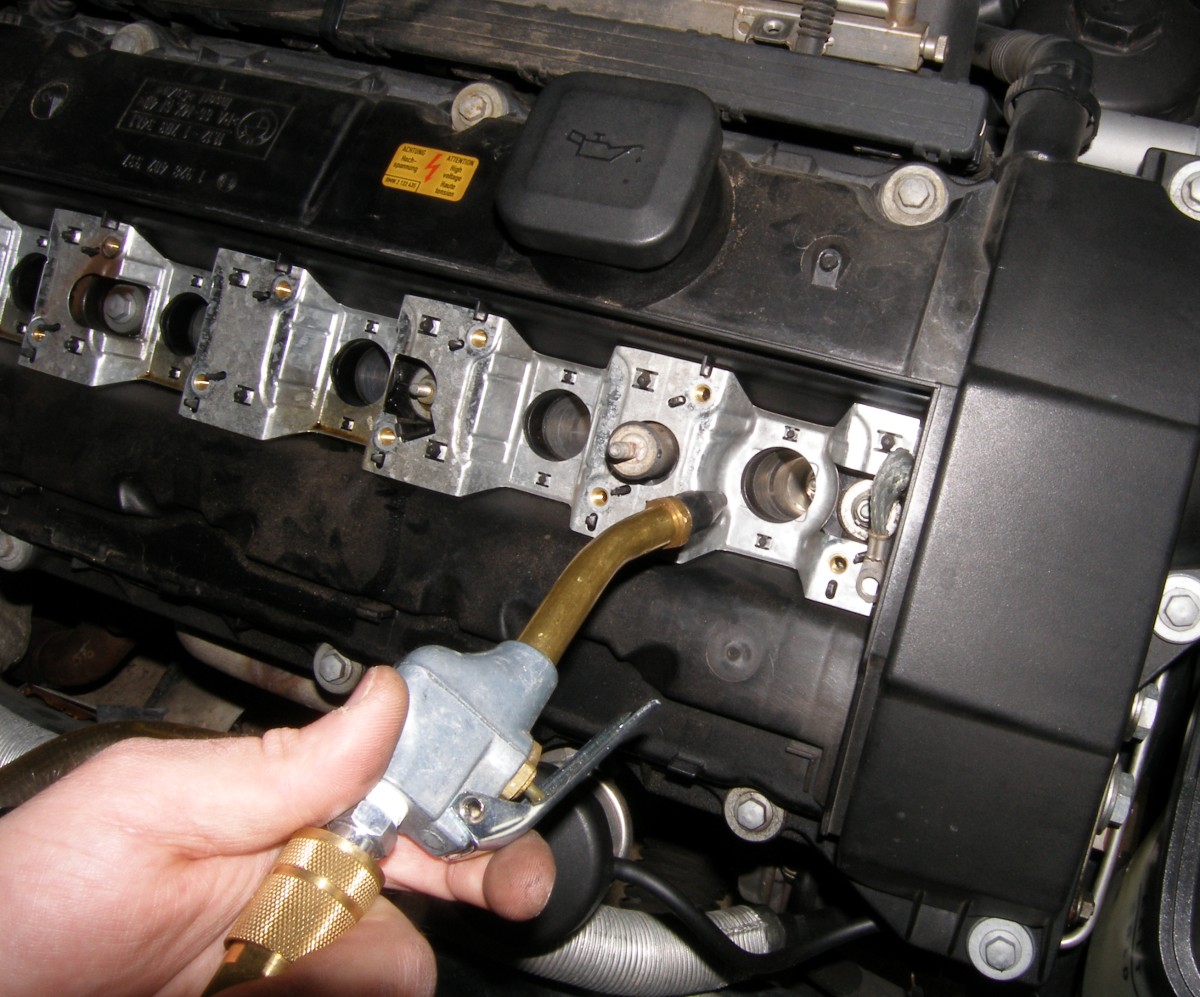
Fig. 2: Plug Hole Cleanout
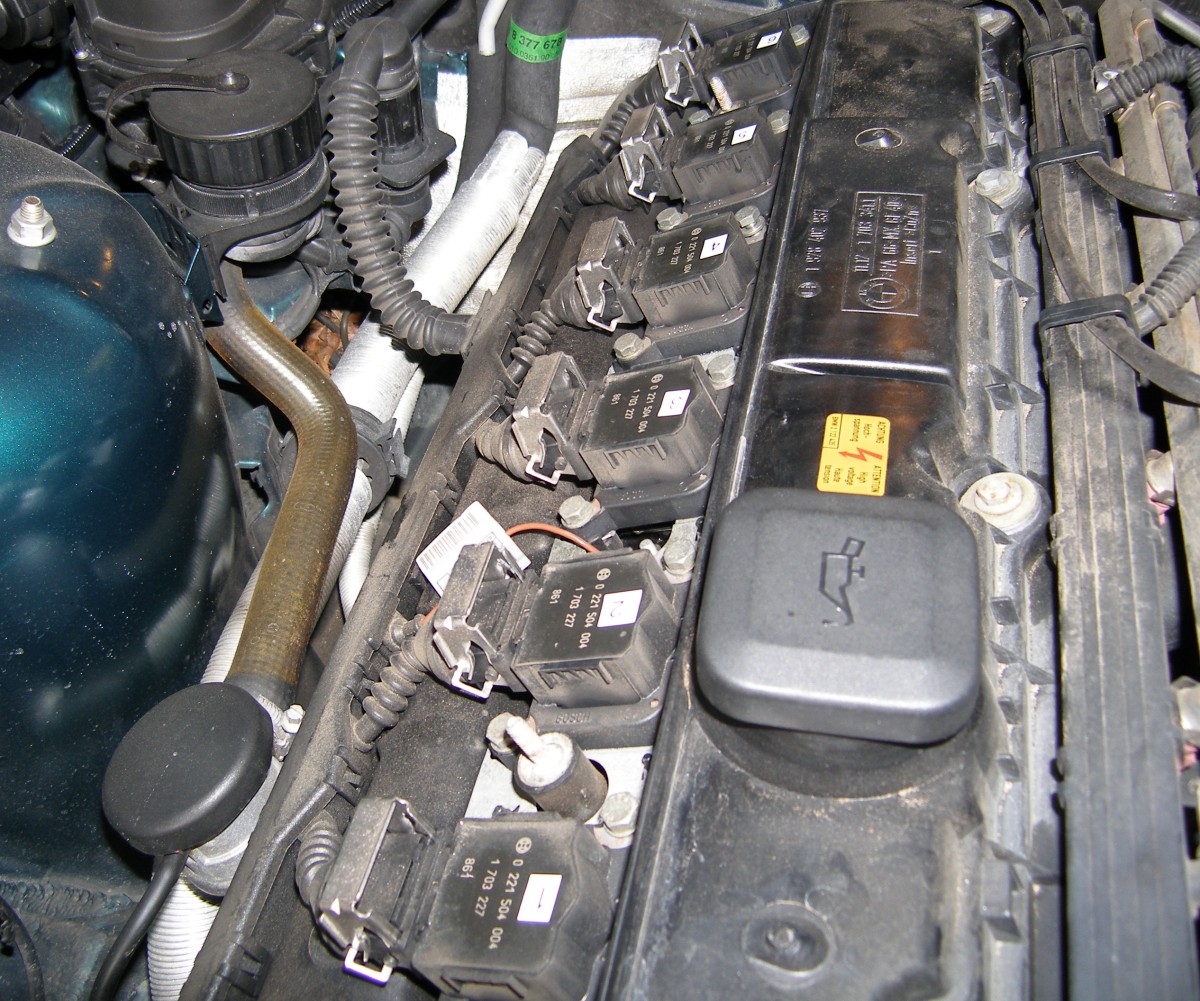
Fig. 3: Coil Connectors
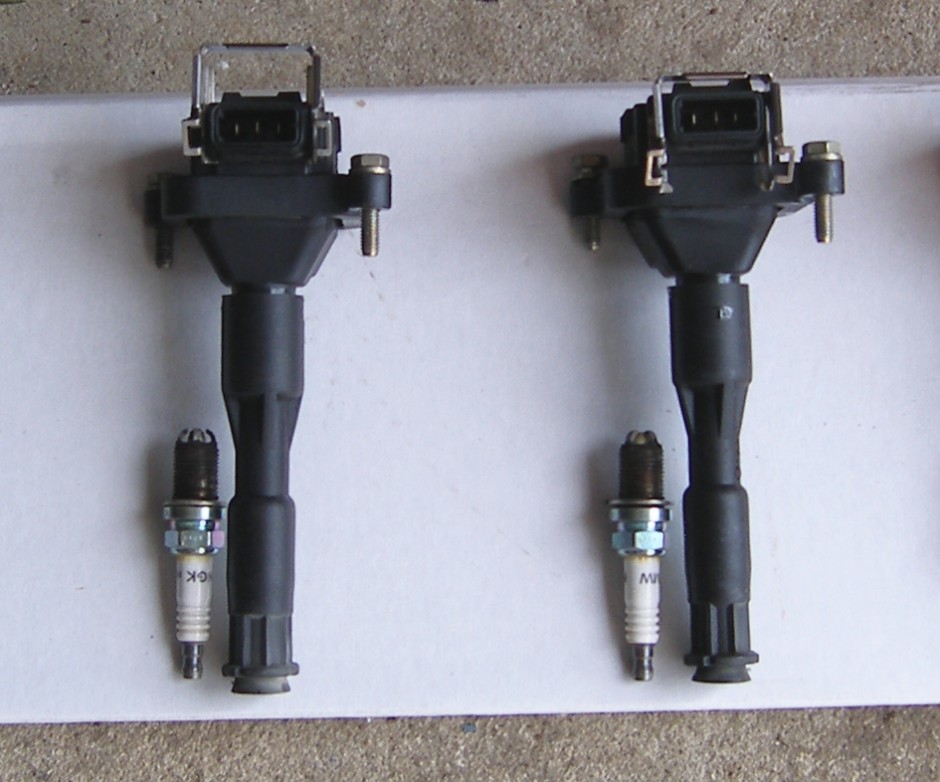
Fig. 4: Coil Detail
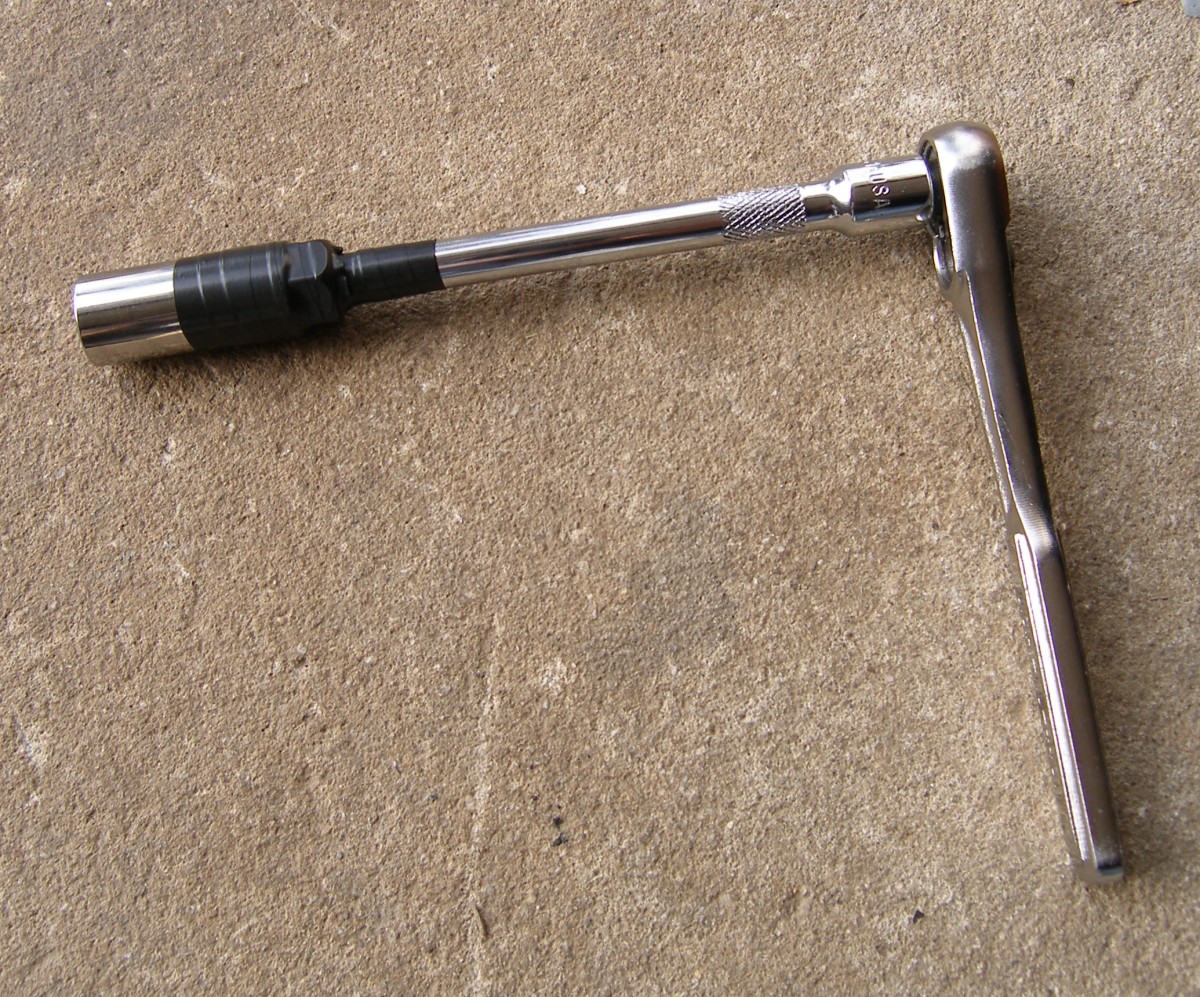
Fig 5: Taped Plug Socket
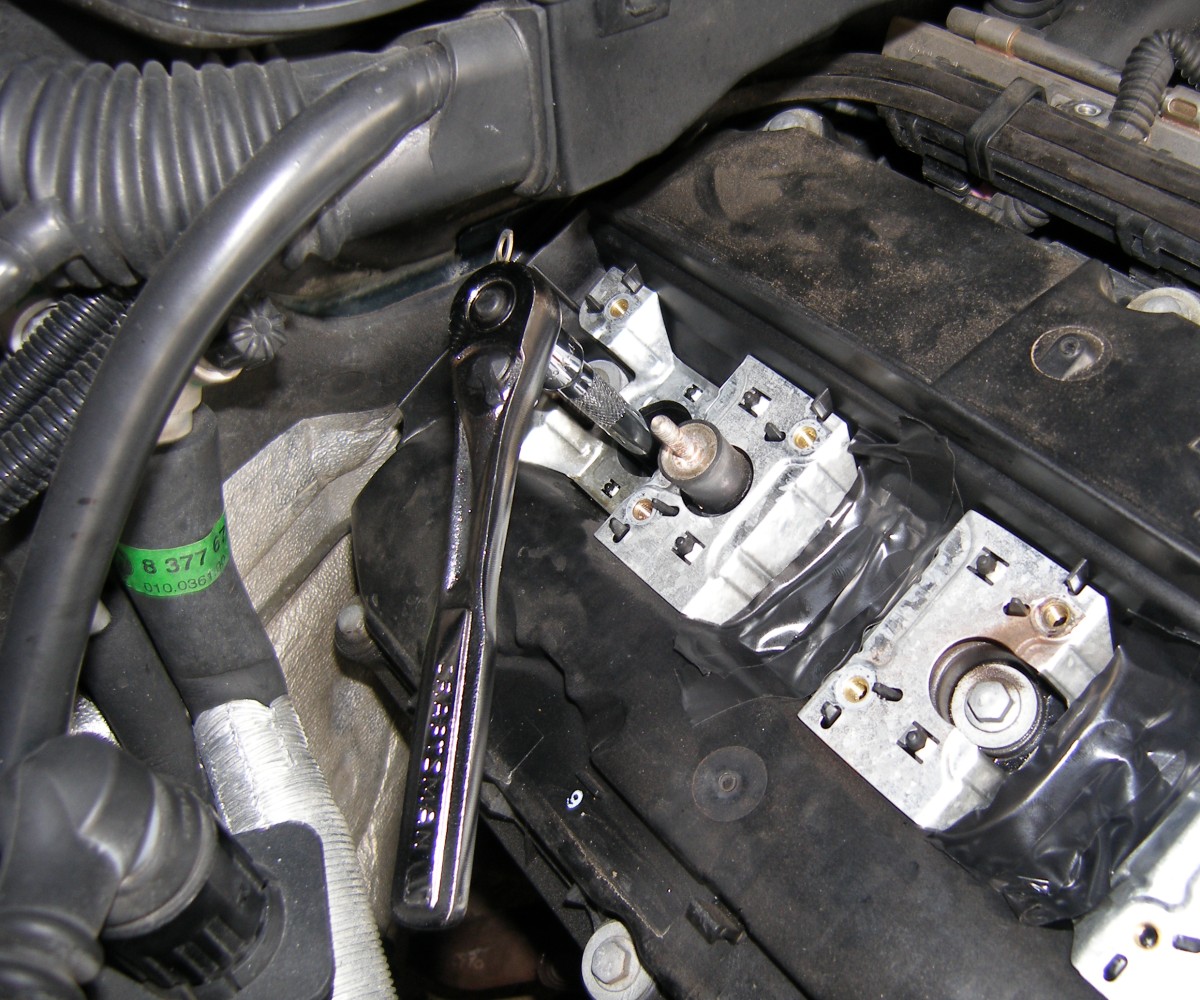
Fig 6: Cylinder #6 Clearance
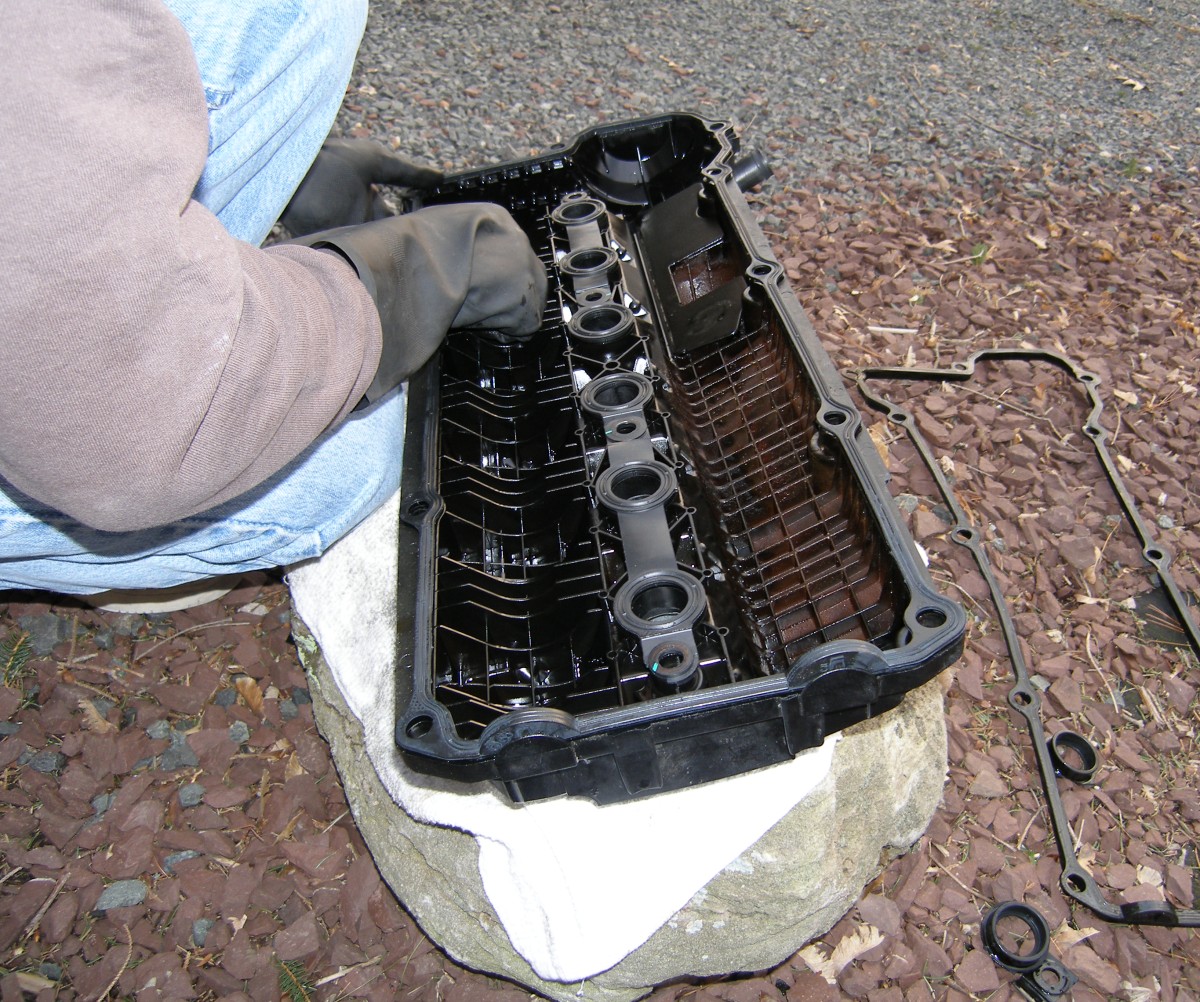
Fig 7: Installing New Gaskets
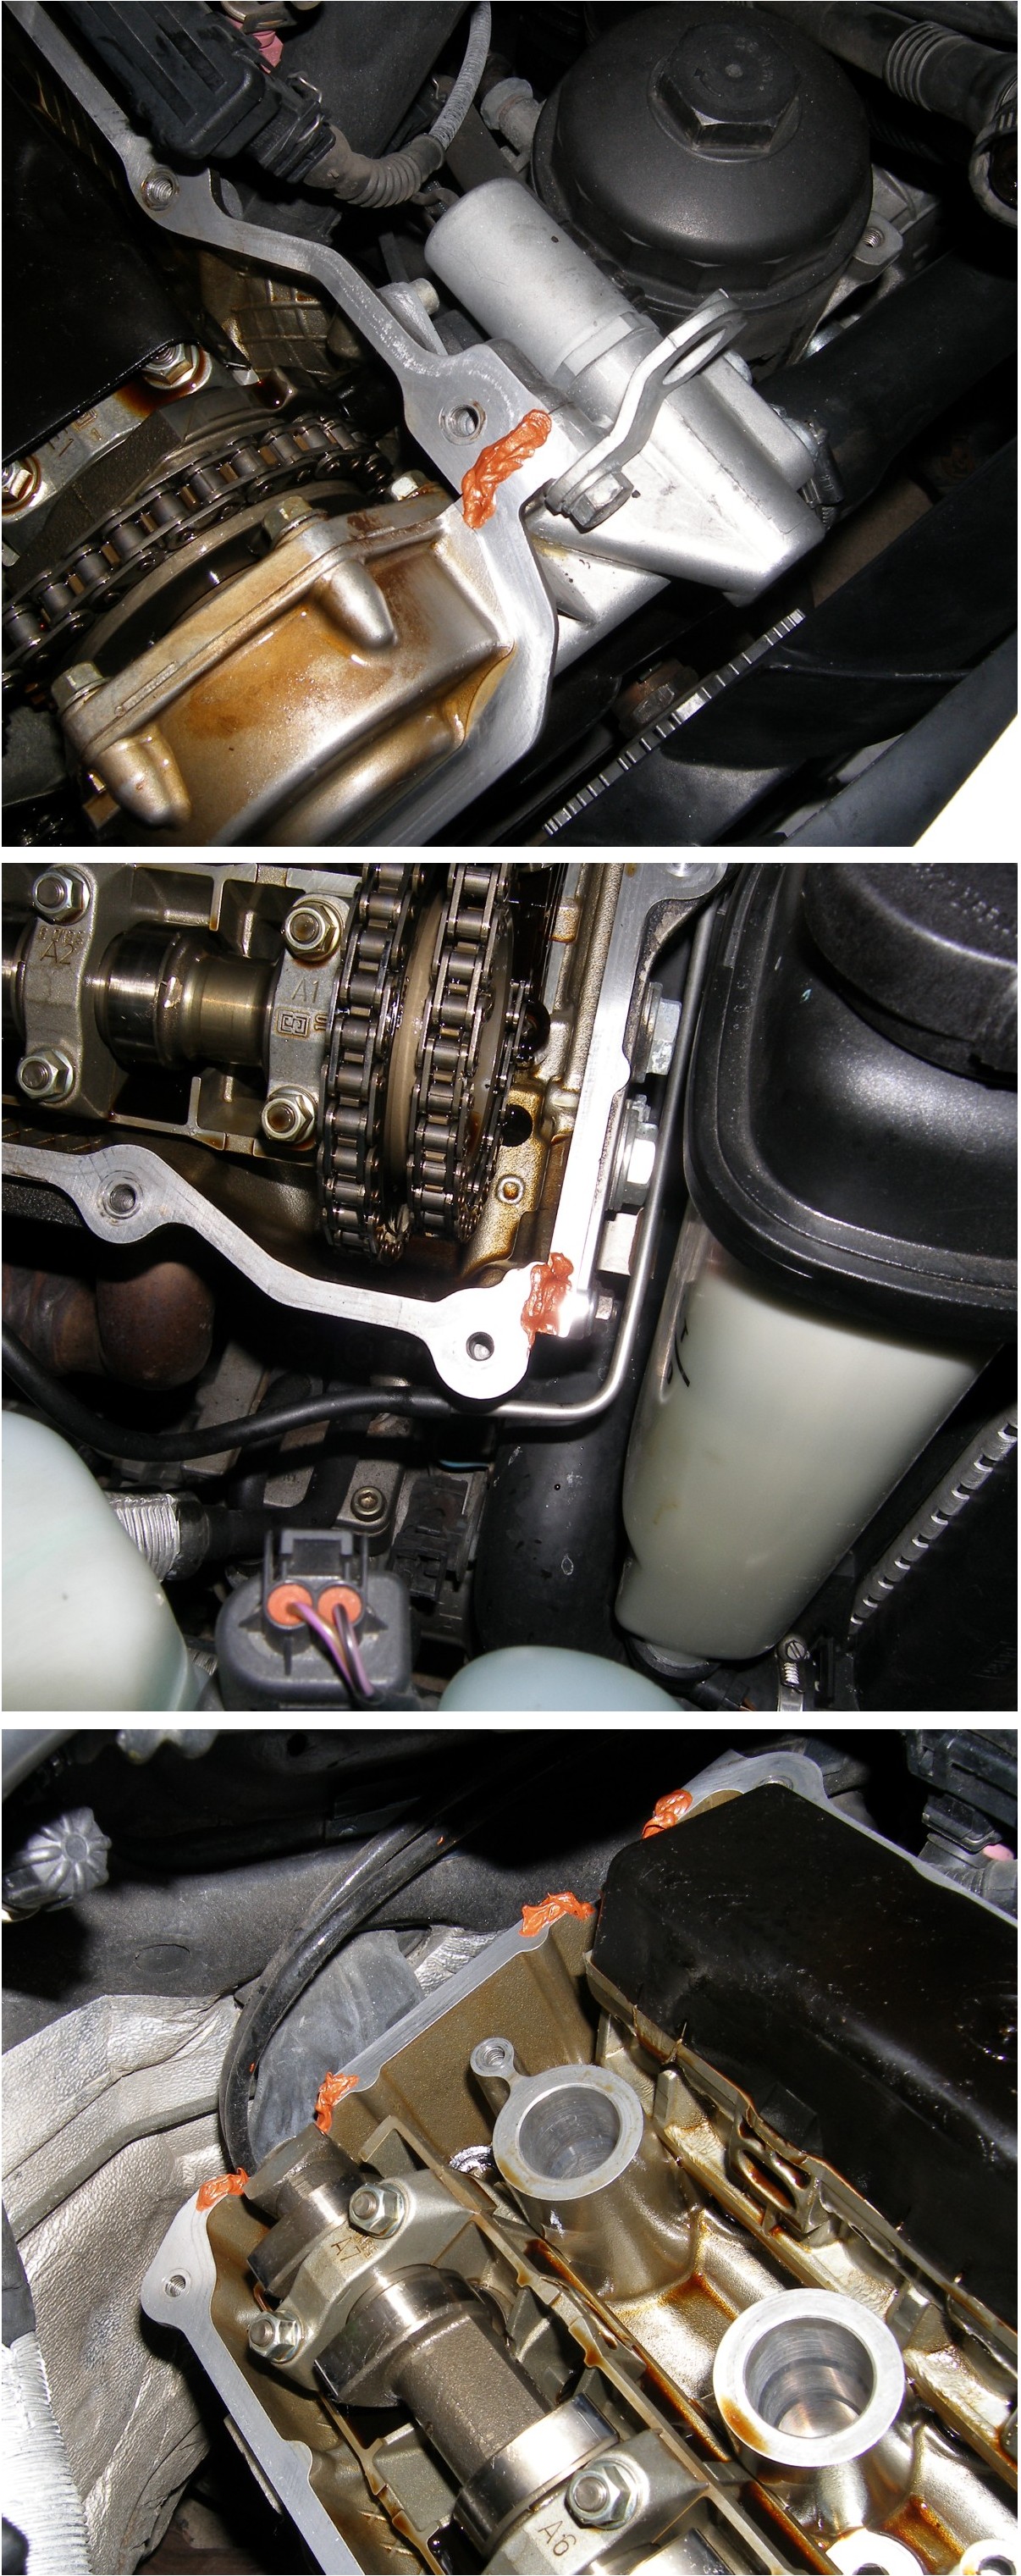
Fig 8: RTV Application Detail [Large]
- Remove the engine covers. There are two covers on the top of the engine. The smaller of the two covers protects the fuel rail and the larger cover protects the coils. The small cover is attached to the engine via 10 mm bolts, while the larger cover is fastened to the valve cover by two 10 mm nuts because the cover is mounted via isolation mounts. Each fastener is hidden behind a small plastic cover that must be pried up with a small flat-blade screwdriver. See Figure 1.
- Optionally label the coils. Place a label on the top of each coil that identifies the cylinder in which it resides. If you're anal retentive like me you'll lay out all the parts you remove in such a way that you keep everything in order so this might be unnecessary, but my P-Touch labeler made quick work of the labels so I applied them. See Figure 3.
- Separate the electrical harness from the coils. Begin by releasing the clip that holds each electrical connector to the coil. All you have to do is pry the clip directly upward and the design of the clip will cause it to move up and away from the coil in order to release the connector. Repeat for the other coils while you have the screwdriver in your hand, and then pull the connectors out of the coils. See Figure 3.
- Move the electrical harness out of the way. The harness wires are contained in a rigid plastic conduit that clips to a mounting flange attached to the engine. To remove the harness, carefully wedge the screwdriver between the retaining clip and the conduit and pull upward on the conduit to release it. There are five clips, two on the side of the conduit facing toward the coils and three on the opposite side. The entire conduit should pop up and away from the engine after you remove 3 of the clips, but mine was stubborn and I didn't want to risk breaking the remaining clips so I took my time and released all five. If you wish to remove the entire conduit from the car you can disconnect it at the cylindrical connector if you desire, but I just moved the conduit out of the way and left it connected to the car. I figured it was one less issue I would have to deal with during reassembly.
- Remove the coils. Each coil is affixed to the valve cover with two 10mm bolts. Coils for cylinders 1 and 6 are grounded to the head with a short bonding strap. Take note of where these bonding straps attach to both the cover and the coil since they are critical for proper functioning of the ignition system. As you loosen the coil retaining bolts you'll feel the coil spring upward slightly. This is due to the spring in the coil boot that connects the coil to the top of the spark plug. When ready to remove the coil, grab it with your hand such that your fingers retain both bolts as you pull the assembly straight out of the head. Place the coil on a flat surface dedicated to organizing the parts you remove from the car. Yes, this is automotive surgery and this should be as well organized as an operation. See Figure 4 for a closeup of the coils. Note the position of both the coil boot and the connector retaining clips (left is open, right is closed).
- Remove valve cover retaining bolts. The valve cover is attached to the head via fifteen (15) 10mm bolts. Four of these bolts are in the center of the valve cover in line with the spark plugs and the remainder are scattered around the perimeter of the cover. Not all of the bolts are the same type so be sure to arrange them on your workbench in order to simplify the reinstallation process. A deep 10mm socket is helpful when removing all of the bolts with the exception of the one at the rear of the vehicle closest to the fuel rail (closest to the center of the car). Clearance with the air plenum cover dictates use of a shallow socket. You may loosen the bolts in any order, but I would definitely recommend taking each bolt out and moving it to your workbench. Don't try to be slick and hold the extra bolts in your hand to save a few minutes of your time, as you're bound to drop one in a bad place. It's important to note that these bolts function more like a nut in that they screw onto a stud that is, in turn, screwed into the head. You DO NOT need to remove the studs to remove the valve cover gasket.
- Remove the valve cover. This is the tricky part. While there is no adhesive used during manufacturing, after years and many thousands of miles, oil can act just as effectively as RTV to bond the valve cover gasket to the head. You'll need to use either a rubber mallet or a small dead blow hammer (as I did) to free the cover without denting, bending, or otherwise damaging it. The trick, I found, was to use a technique borrowed from other work on the vehicle. Rather than give the cover a bunch of hard whacks, tap it quickly and repeatedly as you use your fingers to pry the cover up slightly and move it from side to side, starting at the front and moving toward the rear. Place more emphasis on the side-to-side motion at first rather than prying upward or you may bend the cover. You should also NOT use a screwdriver or other metal device as a pry bar because you can gouge the head. Be firm, but gentle.
- Remove old gaskets. While the gaskets are installed in the valve cover, the smaller gaskets in particular may decide to stay with the head. If that happens, you may feel resistance as the valve cover gives way. While it's not a big deal if the plugs are installed, it's in your best interest to keep the gaskets in one piece as you remove them so bits of gasket don't wedge themselves in areas that are hard to reach. After the cover is separated from the head, simply take the cover elsewhere and peel all of the gasket material away out of the slots in the cover. I had no problems removing the gaskets from either the head or the cover.
- Clean up the valve cover and the mating surfaces on the head using some brake cleaner sprayed on a lint-free rag. The goal here is to remove any gasket material that may have been left behind so the mating surfaces are smooth. In my experience, the gasket material broke into a few pieces, but didn't leave any residue behind and I expect that to be the case for most people unless you're doing this for the first time at 200K miles or more...at which point the rubber may have broken down. You should pay particular attention to the areas to which RTV will be applied (see Figure 8). These should be free of oil so the RTV sticks to the head and does its job.
- Install the new gaskets on the valve cover. This is a pretty simple (and fun) process. Simply lay the valve cover upside down somewhere convenient and press the gaskets into the cover. I used gloves for this process only because the valve cover was still coated in oil. I don't necessarily recommend doing this outside, what with the risk of debris blowing into the valve cover, but I did so to get good light for the photo. And speaking of the photo, see Figure 7.
- Seal the seams on the head as recommended by BMW. There are four spots on the head that BMW wants sealed with a special sealant. Most technicians, including mine, use a common high temperature, oxygen sensor-safe RTV. I used the copper version because I wanted it to stand out for the pictures, but my technician used the silver (dark gray, actually) type on my brother's car recently. I think both types exceed the temperature requirements so it's likely safe to use whatever you have on hand. See Figure 8 for a photo composite of the locations to cover and how I applied it. The best advice I can give is be neat about it and don't go overboard. All you need is a thin film, really.
- Reinstall the valve cover. Before the RTV sets, return the valve cover to the head and HAND tighten all of the retaining bolts. You can do this in any order, but you might as well follow the same order you'll use to torque to the final spec. I've heard people recommend a number of techniques here, but my technician said he does them in a Z formation. I don't think the order is as important as the degree to which you tighten the bolts in relation to each other. In other words, don't just torque the first bolt to spec and move on. Tighten each one a little bit at a time, and before you know it all of the bolts will bottom out at the same time. That's what happened to me and I wasn't particularly careful about counting the degrees of turn or anything like that. I did it all by feel. I recommend counting off each bolt as you check it for final torque as a mental note that you remembered all 15 bolts, however, as it would really suck to put everything back together and get that sinking feeling that you forgot to torque one or more bolts properly (which WILL result in a leak, let me assure you). Note that these bolts will spin fairly freely and then bottom out. It's at that point you need to apply the final torque of 89 inch-pounds. Nothing hard about this, but be aware that the most accurate torque is achieved while the fastener is moving, so try to use a long arc rather than a bunch of short ones in order to maximize the chance of bottoming the fastener while in the middle of that arc. Simple, really, but I figured I'd mention it.
- R&R plugs if desired. Now with the cover back on, you can breathe a bit easier about the risk posed by dropping stuff into the engine, which explains why I recommend doing the plugs AFTER the valve cover gasket replacement is complete. Before you remove the plugs, however, do two things:
- Cleanup the spark plug wells before you remove the plugs. If a spark plug well is dry, use compressed air to blow out any debris that may otherwise fall into the cylinders when you remove the plugs. See Figure 2. If you find oil near the plug use a rag to soak up the oil before you remove the plug. Wrapping the rag around a long, thin screwdriver helps to get the rag far enough down into the well to do the job.
- Take the time to secure the spark plug socket to the 6" extension with some electrical tape. This will prevent the socket and extension from separating in the event the socket fits tightly with the plug. See Figure 5.
- R&R coil plug boots if desired. Depending on the mileage on your engine you may consider replacing the coil boots. Usually the boots dry out and crack which allows the spark to jump to the head and cause a misfire. I found my original coil boots in surprisingly good condition, though the electrodes on either end were a bit oxidized. They probably could have remained in service longer but I had the parts on hand and had everything apart anyway, so I replaced them. I expect these boots to last the remaining useful life of the engine (that is to say, the point at which I pull it to transplant an S52!) :-) The technique I used to remove the boot from the coil is what my technician suggested: assuming you're right-handed, hold the top of the coil in your left hand and grab the boot at the base of the coil like you would a motorcycle throttle grip and TWIST carefully back and forth as you simultaneously pull the boot away from the coil. To install the new boot, simply mate the coil and the boot and push until you feel the boot "lock" to the pin at the base of the coil, or until the rubber boot can't go any further. See Figure 4.
- Reinstall coils and the electrical harness. Unfortunately, I could not find a torque spec on the coil retaining bolts, so I based the torque off of the size of the bolt and my perception of the torque required to remove them. I ultimately settled on 10 ft*lbs. I don't think you need to go crazy here -- just make sure they're tight enough that they won't back out and make sure they're all torqued to the same value.
- Leak check. Before you reinstall the engine covers, start the engine and look for leaks. Obviously, if you've done your job right the engine should be dry as a bone. You'll need to use a telescoping mirror to examine the rear third of the valve cover. Pay particular attention to the areas that you sealed with RTV. When done, take the car out for a short test drive to make sure everything is fine. You should notice no hesitation or misfires, and most certainly no check engine light (CEL). If the CEL illuminates, you'll need to connect an analyzer to determine the cause, which in this case is usually a misfire due to a defective plug or a loose ignition harness connection.
- Reinstall the engine covers and grab a beer, 'cause you're done!
Conclusion
The biggest problem with this work is that it's bad for the back. Even if you're in relatively good shape, try spending 3+ hours hunched over a vehicle and you'll find your ability to stand upright somewhat compromised. This is one of the many reasons I took several breaks over the course of the work. I'm not sure how techs do this job under time pressure, but perhaps it's because the average professional only takes an hour (or less) to do the entire job that it's not so bad. It may help to jack up the front end to lessen the angle at which you need to bend over, but I'm not sure if that would hinder one's reach into the rear of the engine bay. Do what works for you.
The work effort took me 3 hours, 45 minutes to complete, but if I include the many short rest breaks and unrelated work (like breaking in my new compressor) the total time commitment was closer to 5 hours. I was definitely taking my time here, so I'm sure the next time I do this I could cut that time down significantly.