If you've ended up here, you ordered/received your car without the $75 satellite prep option (SA 693). At some point you decided to wanted factory SIRIUS satellite radio, went to the dealer, and they informed you that satellite radio could not be retrofitted to your car, as it did not have the satellite prep option. It took me a month of digging for information, waiting for software upgrades, and trial and error, but I've successfully installed the BMW factory satellite radio in a NON satellite prepped E90. Hopefully this guide will guide any adventurous DIY'ers to a successful install.
First things first:
1. Please read the WHOLE DIY before you begin. The process has to be done in a specific order.
2. The whole process will take at least 2 visits to your local service center for software upgrades.
3. The install was performed on a US E90 (330xi). I don't know if this method will work for Canadian cars...and I don't think the rest of the world has SIRIUS.
4. This install requires an external antenna. It does NOT use the shark fin. (more about this later)
5. After the install, you will NOT have the option of installing the CD changer (unless you remove the satellite radio)
6. This install does require a fair amount of disassembly, and potential damage to your vehicles wiring harness. If you don't feel confident disassembling wiring harnesses, this job ISN'T for you.
Tools and Materials:
1. BMW SIRIUS receiver p/n 65 12 6 948 064, includes a 1 year (12 months) subscription. I got mine private sale for $375, you can get one here:
http://www.circlebmw.com/parts/sirius/sirius-e90.htm
2. SIR-MINI or SIR3 SIRIUS antenna, includes cable. Look online. I got my SIR3 with the splitter listed below for $30 shipped on eBay.
3. SIR-SP SIRIUS splitter (splits the antenna into dual connections for BMW receiver)
4. T25 Torx bit/socket
5. Razor blade/utility knife
6. Interior fastener remover (a large screwdriver can substitute)
7. Small scredriver
8. Double stick tape (3M molding ahesive tape)
9. The name of your local service center manager
10. A 6 pack for your local service center manager
Assuming you can get your hands on the above items, lets start in.
Phase 1.
VERY IMPORTANT. Take your car to BMW. Request a software upgrade to the latest code for all installed options. Let them know that you will be installing the factory SIRIUS radio DIY and need the software upgraded before you do the install. Depending on how well you know your services center/how cool the SA is, you may want to let them know what you have planned. I happened to have my alarm installed at the same time. ($400 total for the alarm installed) You'll notice that the radio and key memory settings are gone, but don't bother resetting everything, as they are going to get blown away again at the end.
Phase 2.
Once you've gotten the software upgraded, now it's time to tear apart your new E90. First thing we need to do is reroute your fiber optic cabling bus (known as MOST cabling from here on is).
In order to get at the MOST cabling, you need to remove your driver’s side rear seat bolster. I had the fold down seats, which made this process easier, but I assume its the same for either type of rear seat. Basically just grip the top of the bolster near the seatbelt, and pull straight out. The bolster will come out, and then you need to lift up to release the bottom prongs. Once you have the bolster off it should look like this:
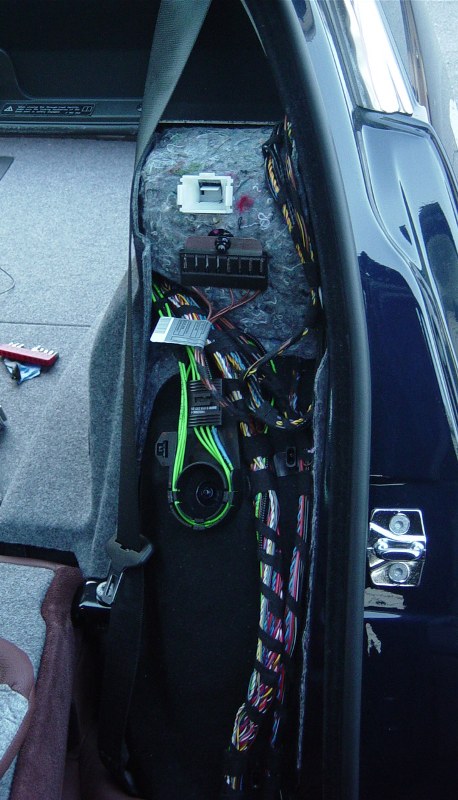
The MOST system works on a loop topology, and all audio devices in your car are part of this loop. You need to add the CD changer cabling into this loop. I used the instructions found in the BMW factory SIRIUS retrofit guide, taken from the pages of this fine forum. I recommend reading the whole document, (found here: http://www.e90post.com/goodiesforyou...iriusRadio.pdf ) but I'll repost the details you'll need at this step below. CAUTION: You are going to be touching fiber cabling, don't bend it sharply! I also recommend labeling ALL the cables before you rearrange them.

Once that is done, don't reassemble the bolster yet. Pull off your CD changer cover in the trunk on the driver’s side, and reach in to pull out the CD changer cable that should be covered in velcroed protective felt. You should have just enough slack to pull out the cable, take off the felt, and connect your SIRIUS unit. At this point insert your key and turn the radio on. If you get NO sound, and a slash over the SOS on your BMW ASSIST (if equipped) you have connected the MOST cabling wrong. Don't go any further till you get your radio working again.
NOTE: I couldn't get mine working following the BMW routing instructions so if the doc doesn't work, here is how I routed mine:
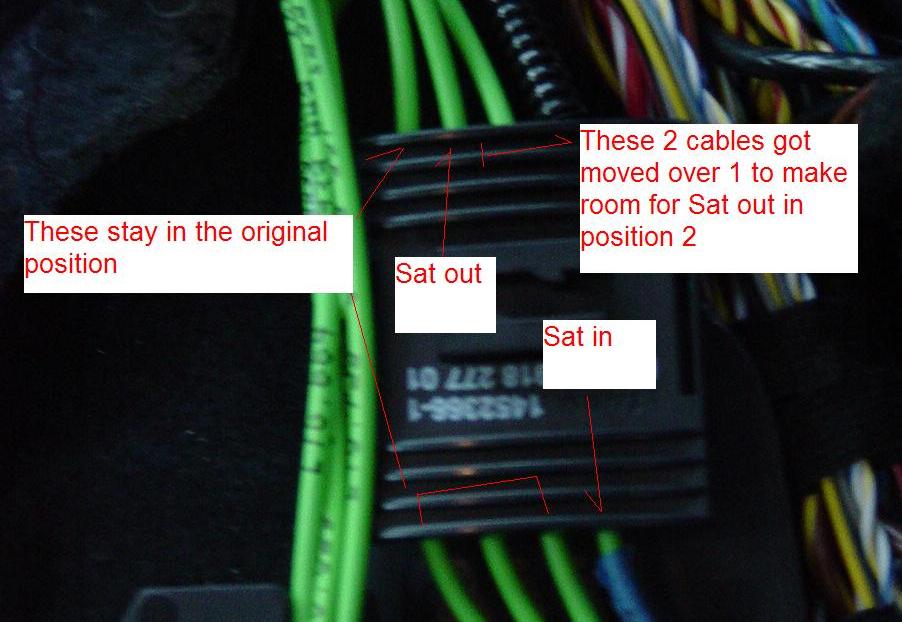
I actually left the system on and connected all the cables till light showed up on the last cable...which meant I have completed the loop.
You will not see SAT show up in your audio options, but with the reciever plugged in and the radio working, you are ready for the next phase. You can put the seat bloster back on if you are confident you have it right.
Phase 3.
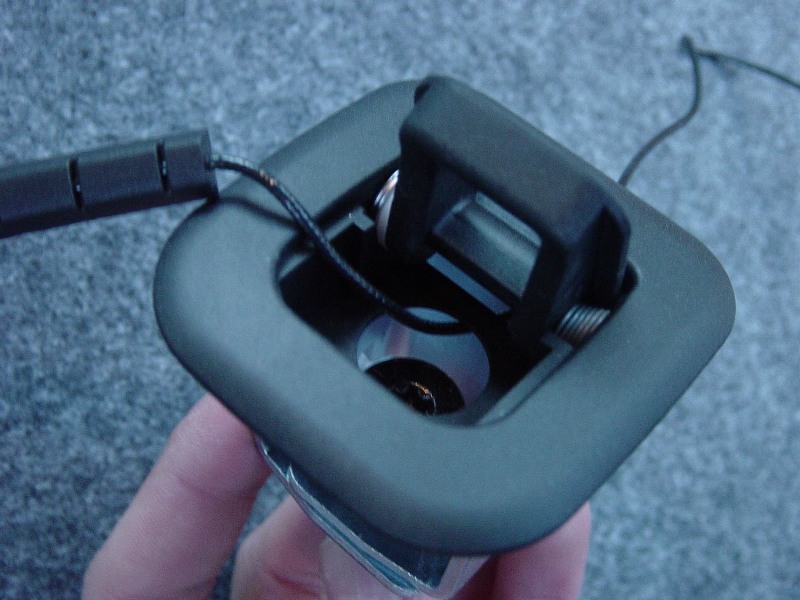
Now you need to run a SIRIUS antenna for your radio, as you didn't get a SIRIUS antenna in your sharkfin without satellite prep. Have no fear, we can hide it well...it doesn't have to mar the outside appearance of your car. I put mine on the rear decklid, on the INSIDE of the car, and it works great. Here is how I did it. You'll notice 3 tie down clips on the rear deck lid. On the center one, lift the clip up, and unscrew the torx bolt: (the pic is after the cable is run but you get the idea)

It's got a fine thread, so it will take a while. Once it is unscrewed, you should be able to lift it out. This is how the wire is going to go from the inside of the car to the trunk.
You'll need to remove the end clip on the antenna cabling by pulling the lock clip off. Just lift out the little clip with a razor blade:

Once its off it will look like this:
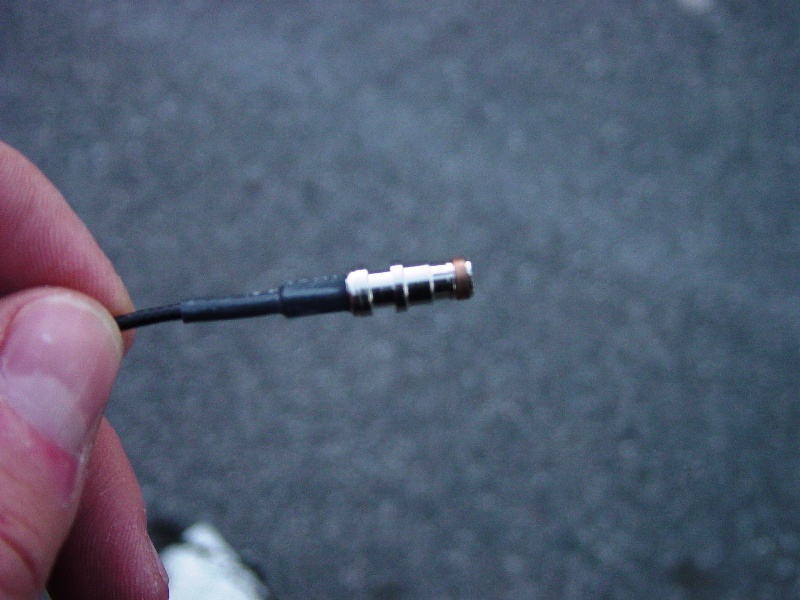
Now the end of the cable is small enough to fit through the whole on the side of the tie down clip, route it like so:
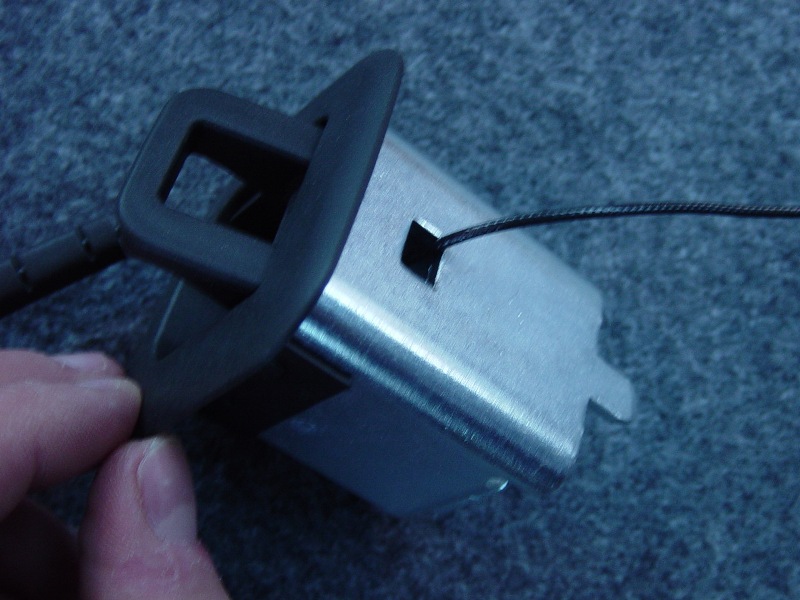
Once you've got the cable through the tie down run it though the whole into the trunk. You'll have to reach up inside to catch the end and pull the excess through. Pull all the slack through, and put the tie down clip back in place, with the antenna in roughly the positing you want it. Don't tighten the tie down’s bolt yet if you want to do some final repositioning after the install:

Put the antenna end clip back on, and let the slack hang in the trunk for now. You're ready for phase 4.
Phase 4.
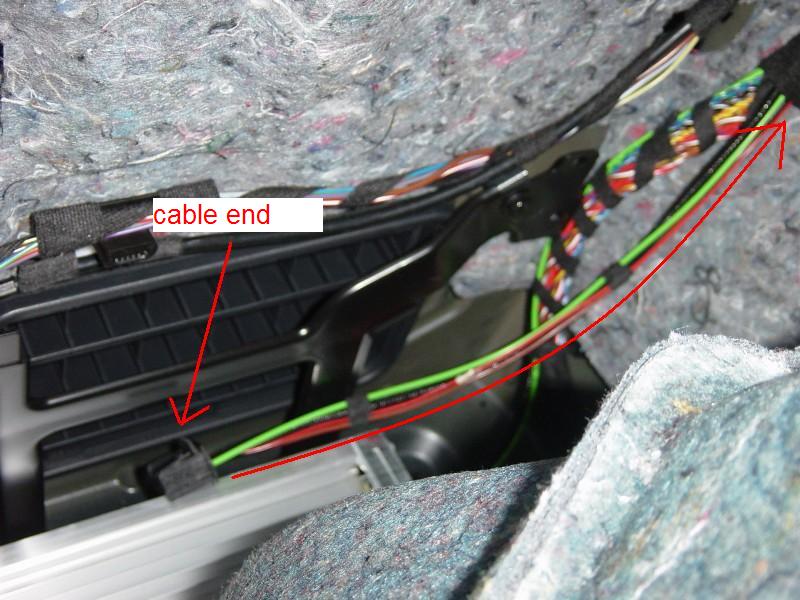
Unfortunately, even though you connected your SIRIUS unit to test in phase 2 to test, you can't just leave your receiver floating around in the trunk, so you're going to pull that CD changer cable to the factory satellite radio install position in the center of the trunk, (next to the assist telematics unit if you have it) where its going to meet your antenna and splitter to get plugged in and installed for good. In order to do this however, you'll need to partially disassemble your trunk, and pick the CD Changer cables out of the rear harness. First, pull the trunk floor up. Then, using a large screwdriver or a specifically made interior fastener remover, remove the 3 plugs that hold the drivers side interior trunk panel on. (pull the center out first, then pull the plug out) Next, remove the tie down clip (same torx as the deck lid one. you should be able to pull the panel away from the side. Instead of removing any other parts, I just pulled the panel towards the center and down, and made enough room to squeak in to do the job. Ah there's our green CD changer cabling and the harness we're going to have to disassemble:
Oops...looks like I hit my attachment limit. I'll finish this in a reply!
First things first:
1. Please read the WHOLE DIY before you begin. The process has to be done in a specific order.
2. The whole process will take at least 2 visits to your local service center for software upgrades.
3. The install was performed on a US E90 (330xi). I don't know if this method will work for Canadian cars...and I don't think the rest of the world has SIRIUS.
4. This install requires an external antenna. It does NOT use the shark fin. (more about this later)
5. After the install, you will NOT have the option of installing the CD changer (unless you remove the satellite radio)
6. This install does require a fair amount of disassembly, and potential damage to your vehicles wiring harness. If you don't feel confident disassembling wiring harnesses, this job ISN'T for you.
Tools and Materials:
1. BMW SIRIUS receiver p/n 65 12 6 948 064, includes a 1 year (12 months) subscription. I got mine private sale for $375, you can get one here:
http://www.circlebmw.com/parts/sirius/sirius-e90.htm
2. SIR-MINI or SIR3 SIRIUS antenna, includes cable. Look online. I got my SIR3 with the splitter listed below for $30 shipped on eBay.
3. SIR-SP SIRIUS splitter (splits the antenna into dual connections for BMW receiver)
4. T25 Torx bit/socket
5. Razor blade/utility knife
6. Interior fastener remover (a large screwdriver can substitute)
7. Small scredriver
8. Double stick tape (3M molding ahesive tape)
9. The name of your local service center manager
10. A 6 pack for your local service center manager
Assuming you can get your hands on the above items, lets start in.
Phase 1.
VERY IMPORTANT. Take your car to BMW. Request a software upgrade to the latest code for all installed options. Let them know that you will be installing the factory SIRIUS radio DIY and need the software upgraded before you do the install. Depending on how well you know your services center/how cool the SA is, you may want to let them know what you have planned. I happened to have my alarm installed at the same time. ($400 total for the alarm installed) You'll notice that the radio and key memory settings are gone, but don't bother resetting everything, as they are going to get blown away again at the end.
Phase 2.
Once you've gotten the software upgraded, now it's time to tear apart your new E90. First thing we need to do is reroute your fiber optic cabling bus (known as MOST cabling from here on is).
In order to get at the MOST cabling, you need to remove your driver’s side rear seat bolster. I had the fold down seats, which made this process easier, but I assume its the same for either type of rear seat. Basically just grip the top of the bolster near the seatbelt, and pull straight out. The bolster will come out, and then you need to lift up to release the bottom prongs. Once you have the bolster off it should look like this:
The MOST system works on a loop topology, and all audio devices in your car are part of this loop. You need to add the CD changer cabling into this loop. I used the instructions found in the BMW factory SIRIUS retrofit guide, taken from the pages of this fine forum. I recommend reading the whole document, (found here: http://www.e90post.com/goodiesforyou...iriusRadio.pdf ) but I'll repost the details you'll need at this step below. CAUTION: You are going to be touching fiber cabling, don't bend it sharply! I also recommend labeling ALL the cables before you rearrange them.
Once that is done, don't reassemble the bolster yet. Pull off your CD changer cover in the trunk on the driver’s side, and reach in to pull out the CD changer cable that should be covered in velcroed protective felt. You should have just enough slack to pull out the cable, take off the felt, and connect your SIRIUS unit. At this point insert your key and turn the radio on. If you get NO sound, and a slash over the SOS on your BMW ASSIST (if equipped) you have connected the MOST cabling wrong. Don't go any further till you get your radio working again.
NOTE: I couldn't get mine working following the BMW routing instructions so if the doc doesn't work, here is how I routed mine:
I actually left the system on and connected all the cables till light showed up on the last cable...which meant I have completed the loop.
You will not see SAT show up in your audio options, but with the reciever plugged in and the radio working, you are ready for the next phase. You can put the seat bloster back on if you are confident you have it right.
Phase 3.
Now you need to run a SIRIUS antenna for your radio, as you didn't get a SIRIUS antenna in your sharkfin without satellite prep. Have no fear, we can hide it well...it doesn't have to mar the outside appearance of your car. I put mine on the rear decklid, on the INSIDE of the car, and it works great. Here is how I did it. You'll notice 3 tie down clips on the rear deck lid. On the center one, lift the clip up, and unscrew the torx bolt: (the pic is after the cable is run but you get the idea)
It's got a fine thread, so it will take a while. Once it is unscrewed, you should be able to lift it out. This is how the wire is going to go from the inside of the car to the trunk.
You'll need to remove the end clip on the antenna cabling by pulling the lock clip off. Just lift out the little clip with a razor blade:
Once its off it will look like this:
Now the end of the cable is small enough to fit through the whole on the side of the tie down clip, route it like so:
Once you've got the cable through the tie down run it though the whole into the trunk. You'll have to reach up inside to catch the end and pull the excess through. Pull all the slack through, and put the tie down clip back in place, with the antenna in roughly the positing you want it. Don't tighten the tie down’s bolt yet if you want to do some final repositioning after the install:
Put the antenna end clip back on, and let the slack hang in the trunk for now. You're ready for phase 4.
Phase 4.
Unfortunately, even though you connected your SIRIUS unit to test in phase 2 to test, you can't just leave your receiver floating around in the trunk, so you're going to pull that CD changer cable to the factory satellite radio install position in the center of the trunk, (next to the assist telematics unit if you have it) where its going to meet your antenna and splitter to get plugged in and installed for good. In order to do this however, you'll need to partially disassemble your trunk, and pick the CD Changer cables out of the rear harness. First, pull the trunk floor up. Then, using a large screwdriver or a specifically made interior fastener remover, remove the 3 plugs that hold the drivers side interior trunk panel on. (pull the center out first, then pull the plug out) Next, remove the tie down clip (same torx as the deck lid one. you should be able to pull the panel away from the side. Instead of removing any other parts, I just pulled the panel towards the center and down, and made enough room to squeak in to do the job. Ah there's our green CD changer cabling and the harness we're going to have to disassemble:
Oops...looks like I hit my attachment limit. I'll finish this in a reply!